Learn how to crochet a cardigan with our beginner video + free pattern!
Veröffentlicht am 22. September 2021 von Sarah J 2 Min LesezeitWith a simple design and repetitive stitches, it’s never been easier to crochet your own cardigan. Learn how to crochet a cardigan and follow along with this free pattern and video tutorial from the wonderful Little Golden Nook. This is the perfect project for beginners to hunker down and create a cozy cardigan for the winter!
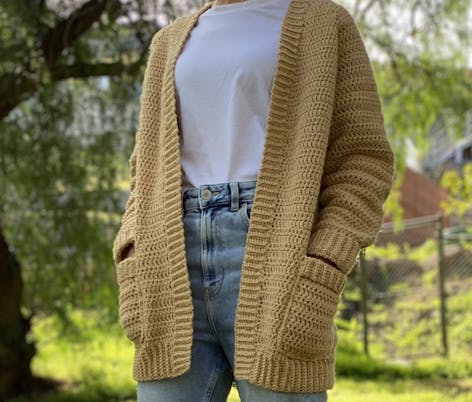
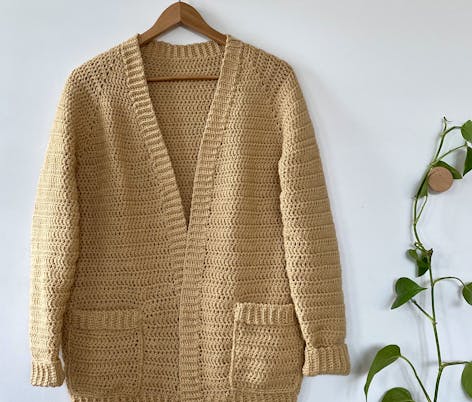
In this tutorial, we'll be making the medium (M) measurement (bust: 91-96cm/36-38”, length: 71cm/28”). This beginner friendly pattern has an oversized fit and is available from S to 5XL. Download the FREE pattern to see how this project is made in your size. Customize in different colors, add stripes and pockets to make this pattern your own!
Materialien
- Paintbox Yarns Simply Aran
- 9 skeins of Paintbox Yarns aran weight yarn
- 5.5mm crochet hook
- 5.00mm crochet hook
- Tapestry needle
Abbreviations
This pattern uses US terminology. Using single crochets (sc) and double crochets (dc), these basic stitches will keep the pattern simple and mindful. You'll have this beginner crochet project hooked up in no time!
- Ch: chain
- St: stitch
- Sts: stitches
- Ch sp: chain space
- Sc: single crochet
- Slst: slip stitch
- Scblo – sc in back loop of st only
- DC: double crochet
- RS: right side, the side of your work that will face out when complete (even numbered rows)
- WS: wrong side, the inside of your work that will remain unseen (odd numbered rows)
Create the yoke of the cardigan
1
Row 1: 2 sc in 2rd ch from hook, 1 sc in each ch to last ch, 2 sc in last ch, ch 2, turn (52).
Row 2: dc 2, (1 dc, ch 1, 1 dc) in next st, dc 10, (1dc, ch 1, 1 dc) in next st, dc 24, (1 dc, ch 1, 1 dc) in next st, dc 10, (1dc, ch 1, 1 dc) in next st, dc 2, ch 2, turn (60 sts).
Row 3: 2 dc in 1st st, dc 2, (1 dc, ch 1, 1 dc) in ch sp, dc 12, (1dc, ch 1, 1 dc) in ch sp, dc 26, (1 dc, ch 1, 1 dc) in ch sp, dc 12, (1 dc, ch 1, 1 dc) in ch sp, dc 2, 2 dc in last st, ch 2, turn (70 sts).
Row 4: dc 5, (1 dc, ch 1, 1 dc) in ch sp, dc 14, (1 dc, ch 1, 1 dc) in ch sp, dc 28, (1 dc, ch 1, 1 dc) in ch sp, dc 14, (1dc, ch 1, 1 dc) in ch sp, dc 5, ch 2, turn (78 sts).
Row 5: dc 6, (1 dc, ch 1, 1 dc) in ch sp, dc 16, (1 dc, ch 1, 1 dc) in ch sp, dc 30, (1 dc, ch 1, 1 dc) in ch sp, dc 16, (1 dc, ch 1, 1 dc) in ch sp, dc 6, ch 2, turn (86 sts).
2
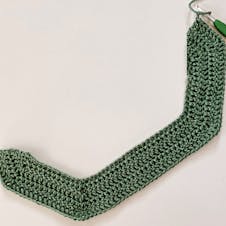
Row 6: 2 dc in 1st st, dc 6, (1 dc, ch 1, 1 dc) in ch sp, dc 18, (1 dc, ch 1, 1 dc) in ch sp, dc 32, (1 dc, ch 1, 1 dc) in ch sp, dc 18, (1 dc, ch 1, 1 dc) in ch sp, dc 6, 2 dc in last st, ch 2, turn (96 sts).
Row 7: dc 9, (1 dc, ch 1, 1 dc) in ch sp, dc 20, (1 dc, ch 1, 1 dc) in ch sp, dc 34, (1 dc, ch 1, 1 dc) in ch sp, dc 20, (1 dc, ch 1, 1 dc) in ch sp, dc 9, ch 2, turn (104 sts).
Row 8: dc 10, (1 dc, ch 1, 1 dc) in ch sp, dc 22, (1dc, ch 1, 1 dc) in ch sp, dc 36, (1 dc, ch 1, 1 dc) in ch sp, dc 22, (1dc, ch 1, 1 dc) in ch sp, dc 10, ch 2, turn (112 sts).
Row 9: 2 dc in 1st st, dc 10, (1 dc, ch 1, 1 dc) in ch sp, dc 24, (1 dc, ch 1, 1 dc) in ch sp, dc 38, (1 dc, ch 1, 1 dc) in ch sp, dc 24, (1 dc, ch 1, 1 dc) in ch sp, dc 10, 2 dc in last st, ch 2, turn (122 sts).
Row 10: dc 13, (1 dc, ch 1, 1 dc) in ch sp, dc 26, (1 dc, ch 1, 1 dc) in ch sp, dc 40, (1 dc, ch 1, 1 dc) in ch sp, dc 26, (1 dc, ch 1, 1 dc) in ch sp, dc 13, ch 2, turn (130 sts).
3
Row 11: dc 14, (1 dc, ch 1, 1 dc) in ch sp, dc 28, (1 dc, ch 1, 1 dc) in ch sp, dc 42, (1 dc, ch 1, 1 dc) in ch sp, dc 28, (1 dc, ch 1, 1 dc) in ch sp, dc 14, ch 2, turn (138 sts).
Row 12: 2 dc in 1st st, dc 14, (1 dc, ch 1, 1 dc) in ch sp, dc 30, (1 dc, ch 1, 1 dc) in ch sp, dc 44, (1 dc, ch 1, 1 dc) in ch sp, dc 30, (1 dc, ch 1, 1 dc) in ch sp, dc 14, 2 dc in last st, ch 2, turn (148 sts).
Row 13: dc 17, (1 dc, ch 1, 1 dc) in ch sp, dc 32, (1 dc, ch 1, 1 dc) in ch sp, dc 46 (1 dc, ch 1, 1 dc) in ch sp, dc 32, (1 dc, ch 1, 1 dc) in ch sp, dc 17, ch 2, turn (156 sts).
Row 14: dc 18, (1 dc, ch 1, 1 dc) in ch sp, dc 34, (1 dc, ch 1, 1 dc) in ch sp, dc 48, (1 dc, ch 1, 1 dc) in ch sp, dc 34, (1 dc, ch 1, 1 dc) in ch sp, dc 18, ch 2, turn (164 sts).
Row 15: 2 dc in 1st st, dc 18, (1 dc, ch 1, 1 dc) in ch sp, dc 36, (1 dc, ch 1, 1 dc) in ch sp, dc 50, (1 dc, ch 1, 1 dc) in ch sp, dc 36, (1 dc, ch 1, 1 dc) in ch sp, dc 18, 2 dc in last st, ch 2, turn (174 sts).
Row 16: dc 21, (1 dc, ch 1, 1 dc) in ch sp, dc 38, (1 dc, ch 1, 1 dc) in ch sp, dc 52, (1 dc, ch 1, 1 dc) in ch sp, dc 38, (1 dc, ch 1, 1 dc) in ch sp, dc 21, ch 2, turn (182 sts).
Row 17: dc 22, (1 dc, ch 1, 1 dc) in ch sp, dc 40, (1 dc, ch 1, 1 dc) in ch sp, dc 54, (1 dc, ch 1, 1 dc) in ch sp, dc 40, (1 dc, ch 1, 1 dc) in ch sp, dc 22, ch 2, turn (190 sts).
4
Row 18: 2 dc in 1st st, dc 22, (1 dc, ch 1, 1 dc) in ch sp, dc 42, (1 dc, ch 1, 1 dc) in ch sp, dc 56, (1 dc, ch 1, 1 dc) in ch sp, dc 42, (1 dc, ch 1, 1 dc) in ch sp, dc 22, 2 dc in last st, ch 2, turn (200 sts).
Row 19: dc 25, (1 dc, ch 1, 1 dc) in ch sp, dc 44, (1 dc, ch 1, 1 dc) in ch sp, dc 58, (1 dc, ch 1, 1 dc) in ch sp, dc 44, (1 dc, ch 1, 1 dc) in ch sp, dc 25, ch 2, turn (208 sts).
Row 20: dc 26, (1 dc, ch 1, 1 dc) in ch sp, dc 46, (1 dc, ch 1, 1 dc) in ch sp, dc 60, (1 dc, ch 1, 1 dc) in ch sp, dc 46, (1 dc, ch 1, 1 dc) in ch sp, dc 26, ch 2, turn (216 sts)
Row 21: 2 dc in 1st st, dc 26, (1 dc, ch 1, 1 dc) in ch sp, dc 48, (1 dc, ch 1, 1 dc) in ch sp, dc 62, (1 dc, ch 1, 1 dc) in ch sp, dc 48, (1 dc, ch 1, 1 dc) in ch sp, dc 26, 2 dc in last st, ch 2, turn (226 sts).
Row 22: dc 29, (1 dc, ch 1, 1 dc) in ch sp, dc 50, (1 dc, ch 1, 1 dc) in ch sp, dc 64, (1 dc, ch 1, 1 dc) in ch sp, dc 50, (1dc, ch 1, 1 dc) in ch sp, dc 29, ch 2, turn (234 sts).
Work on the body of the cardigan
1
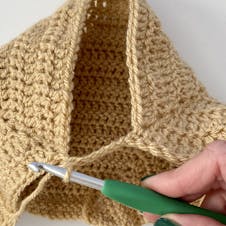
Row 1: dc 30, 1 dc in ch sp, ch 7, skip the next section of dcs (the sleeve), 1 dc in next ch sp, 1 dc in each st across to next ch sp, 67 dcs, 1 dc in ch sp, chain 7, skip the next section of dcs (the sleeve), 1 dc in next ch sp, dc 30, ch 2, turn (144 sts).
2
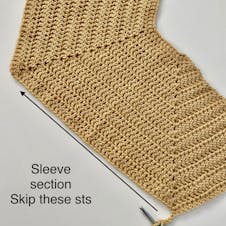
Row 2: 1 dc in each st across to end, ch 2, turn (144).
3
Repeat row 2 until your cardigan (from centre of neck to bottom) measures approximately 66cm ending with a WS row so that you finish at the left hand corner (or right corner facing the cardigan. Do not fasten.
Pro Tip
You can add extra length to your cardigan if you wish! Allow just over 5cm for additional ribbing length.
4
Switch to 5mm hook and chain another 9 (you have already ch 2 after your last row) (11).
Row 1: sc in 2nd chain from hook, and in each chain back to the body (10).
Now sl st into the stitch (dc) to the left of where you chained from, then sl st into the next stitch, ch 1, turn.
Row 2: skip 2 sl sts, scblo for each stitch to the end of ribbing, ch 1, turn (10).
Row 3: scblo in each stitch back down to the body, sl st in to stitch (dc) to the left of your work, sl st again to the left, ch 1, turn (10).
Row 4 onwards: repeat rows 2 and 3 until you reach the end of your cardigan.
Fasten off.
Crochet the sleeves
1
With 5.5mm hook, attach yarn to the center (4th) chain at the under arm with WS facing, ch 2.
Round 1: 1 dc in next ch, and in the next 2 chs, dc2tog over the ‘corner’ by inserting hook into the side of the dc, and then into the 1st st (see photo) 1 dc in each stitch around to the other ‘corner’, dc2tog, 1 dc in each of the 3 last chs, join to 1st dc with sl st, ch 2, turn 59.
Pro Tip
For your sleeve rounds, your first dc is worked into the first stitch AFTER the space at the base of your ch 2. Your last dc is worked into the space at the base of the ch 2. This method will create a less visible seam.
2
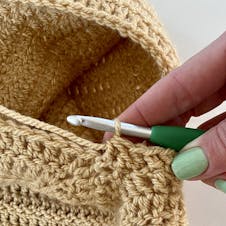
Round 2: dc2tog, 1 dc in each stitch around to last 2 sts, dc2tog, join to 1st dc with sl st, ch 2, turn 57.
Round 3: 1 dc in each st around, join to 1st st with slst, ch 2, turn.
Round 4: dc2tog, 1 dc in each remaining st, join to 1st st with slst, ch 2, turn 56.
Round 5: rep round 3 56.
Repeat round 3 twice, and round 2 once (decrease every third round) until end of row 25. 42 sts.
3
Once you have worked 25 sleeve rounds, try on garment and check sleeve measurement (from underarm to end), then continue to repeat round 3 only, to reach length needed*, finishing with a WS round.
Pro Tip
Your sleeve should be approximately 33 - 35cm, (allow 6cm extra for your final round and the ribbing) and sitting at your wrist, just before your hand begins.
4
Final round (RS): *dc2tog, dc 3*, rep between * * 7 more times, dc 2 join to 1st st with slst, do not fasten off. 34 sts.
5
Switch to 5mm hook and chain 11.
Row 1: sc in 2nd chain from hook, and in each chain back to the body (10).
Now sl st into the stitch (dc) to the left of where you chained from, then sl st into the next stitch, ch 1, turn.
Row 2: skip 2 sl sts, scblo for each stitch to the end of ribbing, ch 1, turn (10).
Row 3: scblo in each stitch back down to the body, sl st in to stitch (dc) to the left of your work, sl st again to the left, ch 1, turn (10).
Row 4 onwards: repeat rows 2 and 3 until you reach the 1st rib row, fasten off with a 20cm tail to sew sleeve closed.
6
To sew the sleeve, turn sleeve inside out. Use tapestry needle and tail to sew through each of the adjacent 10 sts of the cuff, then weave in remaining end.
Add neckline edging
1
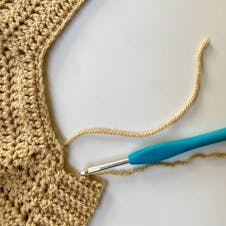
With 5mm hook, attach yarn to the bottom left hand corner of your cardigan, chain 8.
Row 1: sc in 2nd ch from hook, sc in each ch to corner, slst into 2nd st up from corner, slst into next (3rd) st, ch 1, turn your work (7).
Row 2: skip 2 x slst, scblo into first sc, scblo into each sc to end, ch 1, turn (7).
Row 3: 1 scblo into each st back to cardigan edge, (slst into next st) x 2, ch 1, turn (7).
Repeat rows 2 and 3, three times so your last slst is into the side of the 1st dc row.
From here, continue to rep rows 2 and 3, but the 2 x slst will now be into the side of 1 dc row.
Next row: skip 2 x slst, scblo into first sc, scblo into each st to end, ch 1, turn (7).
Next row: 1 scblo into each st back to cardigan edge, slst into the 2nd row of dcs*, inserting your hook into (not around) the middle of the dc, essentially splitting it, then doing the same (slst) into the sp between rows (above the same dc), ch 1, turn (7).
*Keep in mind that you work two rib rows for every dc row
2
Alternate the last two rows, up to the shoulder where your dc rows stop, then continue your rib rows, using the original starting chains to slst into.
Then work down the other side of the cardigan with slsts into dc rows, and then down the bottom ribbing to finish at the corner.
You did it - your crochet cardigan is now complete, yay! Why stop there? Add cute crocheted pockets to your cardigan or start your next project with one of our patterns!


