How to read a knitting chart
Published on 22 June 2020 By Yaz 5 min read
Can’t wait to knit the coolest cables, zingiest colourwork or dreamiest lace? Learn how to read a knitting chart and unlock a whole treasure trove of fab knitting projects! Elizabeth Bagwell will talk you through how to follow a knitting pattern chart and 6 essential questions to ask yourself before you know how to knit from a chart.
What is a knitting chart?
A knitting chart is a visual chart that maps the steps of your knitting pattern without using words. Learning how to read a knitting chart is a great skill to add to your toolkit as you move on to more challenging projects.
How to read a knitting chart
Charts are compact and show a whole section of knitting on one page, usually as one image, which is one reason knitters love them!
9 basic rules for reading any knitting chart
Although different designers, publishers and countries have different house styles, there are a few basic rules that most charts (I would say 'all' but someone would prove me wrong) follow.
- Charts are written as though you're looking at the front side (right side) of a finished piece of knitting. Stocking stitch would therefore be a blank chart, even though you purl on the wrong side.
- Charts don't change whether you're knitting flat (back and forth) or in the round, but the key might (e.g. an ssk in the round might be a p2tog knit flat).
- The first stitch on the first row you knit will be at the bottom right.
- If you're working in the round, all rows are read from right to left and each row represents one round.
- If you're working back and forth, row 1 and the odd rows are read from right to left. Row 2 and the even rows are read from left to right.
- Alternate rows may be omitted entirely, particularly on lace patterns, so check before you start.
- Blank squares represent knit stitches.
- Squares with dots represent purl.
- Black boxes indicate that there is no stitch there.
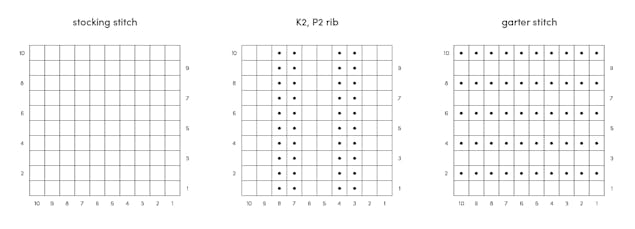
This may seem counter-intuitive, but it means that as you knit row 1, you'll work each stitch on your needle in line with the chart. As we knit right to left (most of us, anyway), the chart is read that way. By working bottom to top, the right side (aka the front, when ready to knit an odd row) side of your knitting will look (all being well) just like the chart when you lay them out together.
Free patterns to try chart knitting!
How to follow a colourwork knitting chart
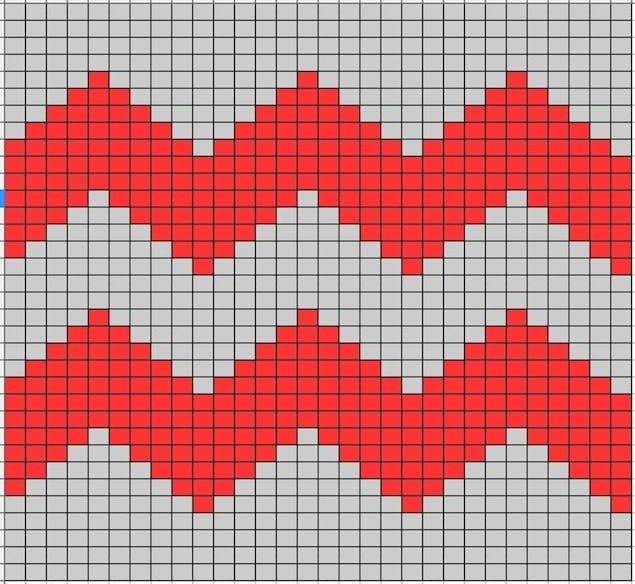
Knitting charts are a fab when it comes to explaining colourwork patterns, because they visually map out how your design should look before you start.
Each block represents one stitch in the colour shown. Colourwork knitting charts rarely include any shaping. If there is shaping, it's typically at the edges of the work (e.g. for a jumper sleeve) and the designer will often assume you’ll be able to work the shape into the project using your skills.
Colourwork knitting chart patterns to try!
How to follow a lace knitting chart
The holes in lace are usually made by increasing a stitch, often with a yarn over ('yo'). To stop the project blossoming out of control increases are usually paired with decreases. Which way the decreases lean is really important, but how you form the decrease may not matter. As a result, symbols tend to be very obviously visual.
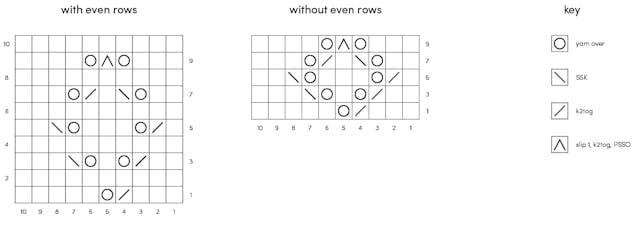
\ refers to a left-leaning decrease, such as ssk
/ refers to a right-leaning decrease
O is a yarn over.
Decreases which are worked over 2 stitches are shown in one box. Work until you come to that box, then work the stitch in the box, then continue. Like in the example of lace chart above, on Row 3: K2, k2tog, yo, K1, yo, ssk, K3 - don’t forget, we're reading the chart from right to left!
Lace chart patterns to try!
How to follow a cable chart
Unlike lace, cable stitches worked over several stitches (e.g. C3F which is worked over 6 stitches) are usually shown spread over that many boxes. The symbols often look like the final result.
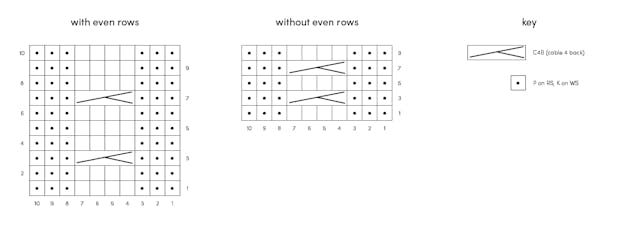
Cable chart patterns to try!
6 questions to ask yourself before using a knitting chart
Picked your chart? Gathered your materials? Ask yourself these 6 questions before you start!
1. Does the chart show all rows, or only alternate rows?
In many stitch patterns, every other row is plain, and therefore not marked on the chart. But not always.
2. Does the chart start at the first row after cast on?
Make sure you check the following: How does the chart fit with the cast on? Do you need to knit a row (or two, or 12) before you start the chart? Is there ribbing?
3. Does the chart start with the first stitch on a row?
If not, what happens to the initial stitches?
3. What happens in the middle?
This is particularly important for patterns like triangular shawls that are supposed to be symmetrical. Often, you'll repeat a simple pattern (e.g. yo, K1, yo) to increase at the spine, but it may be more complex.
4. Is there any shaping?
And if so, are you expected to integrate it with the chart yourself (common for colourwork) or is it clearly explained?
5. Do the words 'At the same time' appear anywhere in the pattern?
They get me every time. I wish publishers would print that phrase in neon, with flashing warning lights!
6. How will you mark your place?
There are lots of good ways – put a piece of paper over the chart, tick off or highlight each row as you knit it, use a post-it to mark your place, use a row counter – just make sure you have at least one method to hand!


