Chic textured pom pom crochet cushion tutorial
Published on 21 September 2020 1 min readIn classic Kate Eastwood fashion, this gorgeous textured pom pom cushion is the perfect crochet project to get your hooks into. A super stylish homeware accessory to elevate your space, and fun to make!
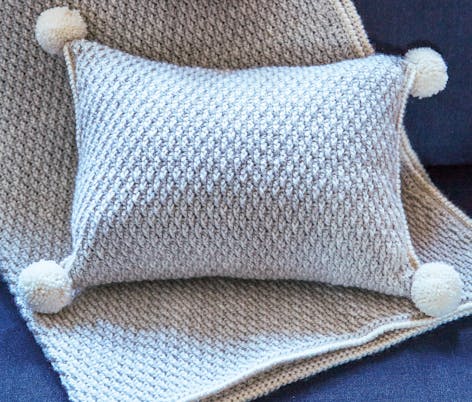
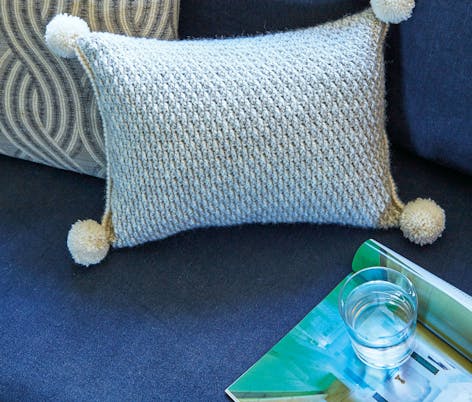
This rectangular cushion is worked in alpine stitch and is finished with a pom pom at each corner as a fun touch! It's finished measurements will be width 40cm (16in), height 30cm (12in).
Materials
- Lion Brand Wool Ease
- x3 balls of Natural Heather (098)
- x1 ball of Fisherman (099)
- 40 x 30cm (16 x 12in) cushion pad
- 3 snap fasteners
- 3 buttons
- 5.5mm (US size I/9) crochet hook
- Yarn needle
- 35mm (1½ in) pompom maker
Tension
15 sts x 15 rows = 10.5 x 10cm
(4¼ x 4in) working Rows 1–3 and then
Rows 4–7 three times, using a 5.5mm
(US size I/9) crochet hook.
Special abbreviations
FPtr (front post treble): yarn round hook, from front of work insert hook from right to left behind post of next st on prev round and through to front again, yarn round hook and pull loop through, [yarn round hook, draw through 2 loops] twice
Crochet your cushion cover!
1
Using 5.5mm (US size I/9) hook and natural heather, ch60.
Row 1 (WS): 1dc in second ch from hook, 1dc in each ch to end, turn. 59 sts.
2
Row 2 (RS): Ch2 (does not count as st throughout), 1tr in each st to end, turn.
3
Row 3: Ch1 (does not count as st throughout), 1dc in each st to end, turn.
4
Row 4: Ch2, *1FPtr in next st, 1tr in next st; rep from * to last st, 1tr in last st, turn.
5
Row 5: Ch1, 1dc in each st to end, turn.
6
Row 6: Ch2, 1tr in first st, *1FPtr in next st, 1tr in next st; rep from * to end, turn.
7
Row 7: Ch1, 1dc in each st to end, turn.
8
Rep Rows 4–7 until work measures 66cm (26in), ending on a dc row, turn.
9
Final row: Ch1, 1dc in each st to end, do not turn.
Making the border
1
Round 1: Work a second dc in last st of prev row (corner made), work 1dc in each row end down left-hand side, 2dc in corner st, work 1dc in each st along bottom edge, 2dc in corner st, work 1dc in each row end up right-hand side of cushion, 2dc in corner st, sl st in top of first st of last row of cushion to join.
Fasten off.
2
Round 2: Join fisherman in top right corner, *2dc in corner st, 1dc in each st to corner; rep from * 3 times, sl st in top of fi rst dc to join.
Fasten off.
Making up and finishing off!
1
Lay the cushion cover on a flat surface, RS down.
Place the cushion pad in the middle, fold the bottom of the cover up and the top of the cover down so that the cushion pad is enclosed, and the two edges overlap.
Pin across the join at the back of the cushion where the opening will be.
Pin the sides.
2
To join the sides:
Row 1 (RS): Using 5.5mm (US size I/9) hook, with RS of cushion facing and using fisherman, work a dc seam to join layers down one side, do not fasten off, do not turn.
3
Row 2: Ch1, work crab stitch clockwise with RS facing as foll: [inserting hook from back to front, work 1dc in next st to the right] up side of cushion.
Fasten off.
4
Rep on other side of cushion.
5
Sew in any ends.
6
Using pompom maker and fisherman, make 4 pompoms.
Stitch one pompom securely to each corner.
7
Stitch the three snap fasteners into place so that the opening of the cushion is closed, and the fasteners are hidden underneath the overlapping flap.
Using a sewing needle and thread, sew the three buttons onto the back of the cushion, directly above where the fasteners are.
Buy a copy of Crocheted Home for £9 (RRP £12.99) plus free UK P&P by using the code LOVECROCHETEDHOME at checkout. To order please go to makeetc.com.
