4 steps to heal yourself from Knitter's Elbow
Published on 21 March 2019 By Anastasia 4 min readAnastasia, is the one woman show behind Garden Wool & Dye, a naturally-hand dyed yarn business that focuses on sourcing wool ethically. She started a Swap Space for trading unused and unwanted yarns, as well as the Local Wool podcast that features small wool producers and their stories. But rewind to 2017 and Anastasia thought she might never knit again. For the best part of a year, Anastasia suffered from "Knitter's Elbow" or Tennis Elbow as you might know it. She's here to give us some great tips for reducing inflammation and building strength to prevent it. Read through and then, as they say, the ball's in your court...

You’re likely asking, “is knitter’s elbow actually a thing?”. Technically, yes, but you’ve probably heard it more commonly referred to as tennis elbow or forearm tendinitis. When you are constantly bearing weight in your hands while moving your wrists, it is not uncommon to experience some inflammation in the muscles that run along the top of your forearms. If left untreated, that inflammation can continue to exacerbate and ultimately force you to put down your needles to rest (I know, you were almost done with sleeve island - I feel you!).
Myself, I dealt with this condition for 9 months and I am not exaggerating when I say that I had a few breakdowns at the thought of never being able to knit again. Exasperated, I finally took matters into my own hands and sought medical assistance. I am now 100% cured and would like to share a few key steps so that you, too, can get yourself back to your stitches!
Full disclaimer: I am not a medical professional in any way and suggest you seek advice from an expert before beginning any treatment.
1. Take a break from knitting
You knew this was coming, didn’t you? Don’t worry, it won’t be forever, but you need to give yourself, and your body, time to recoup. The amount of time needed for rest will depend upon your personal situation.
2. Reduce the inflammation
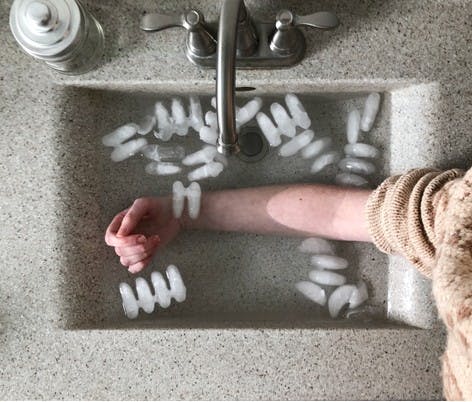
This is the most important step you can take to get yourself on the road to recovery. If you have a favorite over-the-counter pain relief medication, start there. Following this, I highly recommend some serious icing of the area. Although slightly time-consuming and cold, ice bath dipping is an incredibly effective technique. Here’s how it works: You fill your sink with both ice and cold water (as cold as you can get it!). Submerge your forearm in the bath and start counting. Remove it from the water after 20 seconds and repeat 9 more times within a total of 2 hours, making sure to give yourself breaks in between. To get the maximum effect, repeat for multiple days in a row.

3. See a physical therapist
My doctor recommended me to a physical therapist, who was an absolute game changer. They have tools at their disposal that us commoners can’t always get our hands on, especially ones that can break down the inflammation further than ice will simply do. Physical therapists will also teach you exercises to re-strengthen those muscles. It may sound silly, but the fact is that this condition occurs as a result of weakness - those muscles just don’t have the strength to keep up with the repeated activity. If you are unable to see a physical therapist, here are a couple of quick tips they were able to share with me.
Get a stress ball.
A good firm one. My house surprisingly had several after attending conferences or company outings. If you have children, a decent amount of silly putty will work as well. Squeezing the ball/putty continuously on a regular basis will build up your grip strength, which relies upon the same muscles as your knitting.
Use a small hand weight to do some forearm lifts.
(By small, I mean around 2 to 3 lbs to start.) Then follow these simple steps:
a
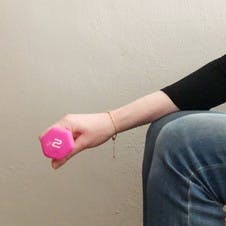
Sit upright in a chair, with your legs at a 90 degree angle. Leaning over as needed, rest your forearm along the top of your leg, with your hand (holding the weight) and wrist hanging over the edge. You then simply use your wrist to raise your hand up, and then steadily release.
b
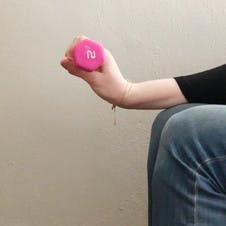
Repeat, lifting your hand up and down. This step is repeated until you’ve exhausted your arm, and then you can come back to it the next day.
4. Continue to exercise your forearm, even after you’ve recovered
Just like anything, your forearm muscles need to be continually cared for in order to perform for you. Whenever you feel like soreness might be coming on again, getting back into those forearm lifts will save you from getting to the place where you are right now. While you are in recovery, or shortly have just recovered, purchasing a compression band is an inexpensive way to stave off the pain while getting some much needed work in. Speaking from experience, a compression band should not be used as a cure-all, it is simply a tool along the road to positive muscle health.
Again, I highly recommend consulting with your doctor to confirm if these steps are right for you. I just want to make sure that you know that there really is hope, and this pain truly can be reduced and eliminated. Keeping ourselves and our muscles strong is key to whittling down our projects wishlist, which I know is burning inside of all of us! Wishing you happy (and healthy) knitting!


