Gorgeous geometric punch needle tutorial
Published on September 21, 2020 2 min readInspired by the beautiful designs Ndebele women painted on their doors to celebrate their creativity, this gorgeous geometric punch needle project by Shikira at Kreative Pursuit is the perfect piece to hang with pride in your home.
Materials
- Monks Cloth 42cm x 42cm
- Embroidery Frame 30cm x 30cm
- Stylecraft Special Chunky
- Black, Cream, Gold, Spice, Aspen, Saffron, Aster and Watermelon
- Paintbox Yarns Simply Chunky
- Tea Rose, Vintage Pink and Rasberry Pink
- 5mm Adjustable punch needle
- Needle threader
- Heat Transfer Felt pen
- Iron
- Drawing Pins
- Ruler
Getting started
1
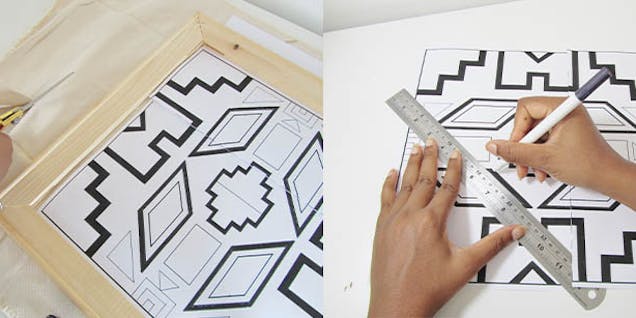
Cut monks cloth to size and print out your 2 page pattern.
Cut along the cut line on the pattern and merge the two pages together using masking tape sticking it to the back of the pattern. Trace around the lines using a ruler and heat transfer felt pen.
2
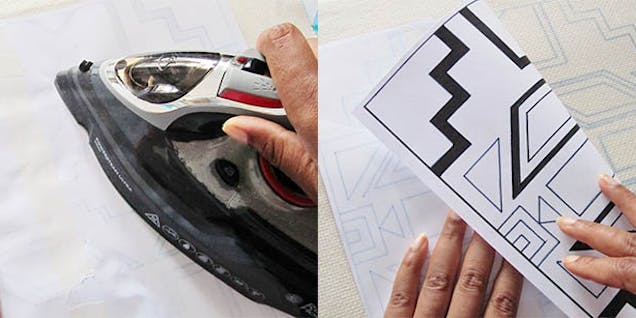
Place the pattern face down on the monks cloth in the center of the fabric. Use your iron to transfer the pattern to the fabric by ironing over the pattern.
Keep the paper in place while holding the iron on top of the pattern for 1 minute before moving along. Keep ironing till the pattern is transferred. Check by holding one hand on the pattern and lifting a corner with the other hand.
3
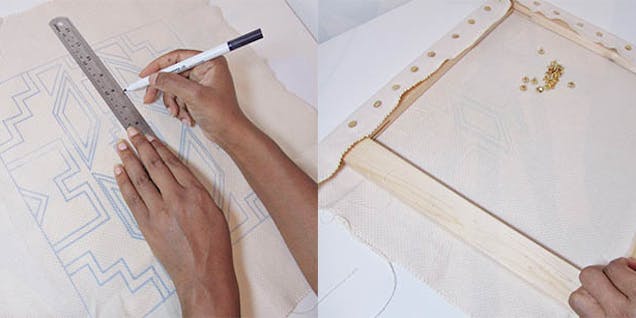
Place the fabric with the transferred pattern face down onto a table top. Touch up any missing areas with a pen and ruler.
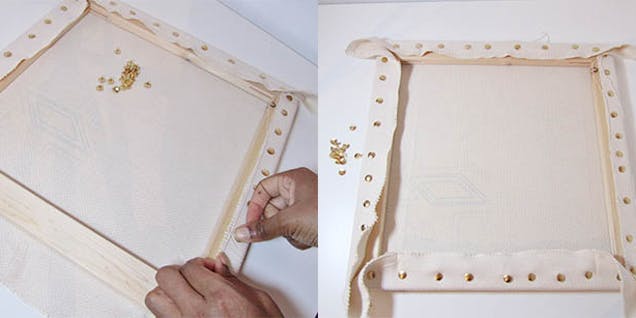
Place the embroidery frame on top roughly so the pattern would be in the center of the frame. Make sure the frame ridge is facing down with straight wood on top.
4
Pull the fabric round the frame securing all the way round with drawing pins to keep the fabric nice a taut read to punch needle.
Flip the frame round and your ready to punch!
Threading your punch needle
1
Push your needle threader up through the needle point end until it appears out the other side.
2
Open a loop in the needle threader and thread through the end of your yarn.
3
Pull the yarn through by pulling the other end of the threader.
4
Thread the needle threader through the eye of the punch needle on the flat side
5
Put the end of the yarn through the loop of the threader again.
6
Pull the yarn through the eye of the punch needle.
Now you're ready to punch needle!
Starting your punch needle project
1
Always hold your needle slanted side facing the direction of your stitches. I recommend punching in a circular/spiralled direction gradually filling the whole area. Keep your ball of yarn free to unwind by itself as you move along your design.
2
When punching stitches, push the needle all the way into the fabric until it cannot go any further. Always keep the tip of the needle gliding along the top of the fabric as you lift it out to do your next stitch.
3
If you make a mistake that’s fine, just pull out the stitches. The fabric will now have left holes from the previous stitches.
Use the point of the needle to mend the holes of the fabric by scraping your needle across the fabric and moving the fibers back into place.
Once the fabric looks as it did when you started you can continue to re-stitch the area again.
4
When you get to a point when you need to stop punch needling, gently pull out your needle leaving a small amount of your thread poking out.
Snip the yarn while still keeping it threaded in the punch needle. You can now move on the fill in the next area.
5
It may start to get messy looking with all the loose yarn hanging around. Just snip those ends close to the stitches so you cannot see were the yarn ended.
6
Keep repeating this process using the recommended colors or your own selection of yarn colors.
Refer to the diagram to see what yarn color is stitched in which areas. After black I used Stylecraft Special Chunky in cream and fill in all areas next to black lines.
7
Once you have filled in all the areas with color and tidied up all loose yarn, you are ready to finish and frame. Take out all the drawing pins securing the fabric.
Put the fabric to one side and lay the frame on the table with ridges face down. Place your fabric on top with flat stitches facing down on the table and loop stitches facing you.
8
Folding the rough edges of the fabric in to make a nice seam, pin the fabric with the drawing pins to the frame to mount. Do this all the way round making sure the fabric is a little taut so it sits nicely when the artwork is standing upright.
9
Hang with pride!
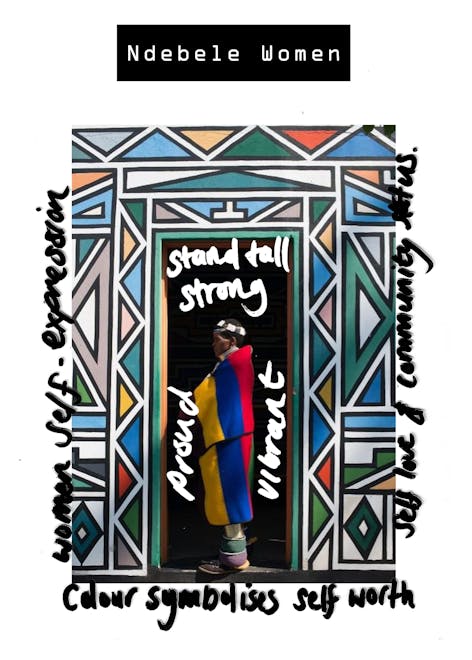
Inspired by the Ndebele Women of South Africa
For as long as I can remember I have always had a curiosity for African culture. My background is from the Caribbean and unfortunately the complexity of Black history has caused a huge divide within cultures, which has lead to the inability to relate to African ancestry. However, over time Black people have reconnected with Africa to embrace our ancestral roots. African culture is so rich in creativity, it’s hard not to be inspired.
I stumbled across this beautiful image of brightly painted geometric houses and decided to look deeper.
Amazing to know that the Ndebele people can be traced back to the early 1600’s! They live in South Africa and are closely related to the Zulu Tribe, as I understand it they separated during a war and the tribe was divided.
Their art is an important cultural characteristic of the Ndebele identity, drawn free hand without any rulers. It is the Ndebele women who are responsible for painting their houses as a form of expression to signify her creativity and self worth. Black outlines are painted using their fingers and then filled in using bright colors.
I loved this idea of woman having this creative outlet to paint their homes as they feel. It is a type of house pride so different to westernised culture. To me their color choices symbolize confidence, freedom and possibly a type of happiness unlike that I know of here.
They dress adorned in vibrant style; bright chunky beaded jewellery cover their necks and arms and they are pictured standing with strong postures, which signify their strength within their society. This is truly inspiring to see as a women.
To think that here we all are aspiring to modern minimalist looks when these women are living a truly vibrant life!
