Make your own macrame market bag
Published on April 21, 2020 By Yaz 2 min readA reusable market bag, made from recycled yarn, what could be more Earth friendly than that? Learn how to make your very own shopper with this step-by-step crochet tutorial with Jane Gois from Tea & Crafting!
Whether you need a shopper for your supermarket trips, or a storage bag for your tea towels, these snazzy multi-purpose macrame bags are fab for all occasions. Designed in Paintbox Recycled T-Shirt yarn (giving old tees a new life!), which come in a rainbow of bright and cool summer shades, pick your fave and follow Jane's steps.
Materials
- Paintbox Yarns Recycled T-Shirt
- 2 x Small Scrap pieces of yarn
- Scissors
- Masking or Washi Tape
- Thread in matching colour
- Hemline Size 18 Tapestry Needles (6)
Before you start
Cut the t-shirt yarn into 36 equal lengths of 2.5m each PLUS 2 x 7m long lengths.
Divide your lengths into 2 x 18 lengths of t-shirt yarn and tie each group together in the centre (i.e. at 1.25m) with some scrap yarn.
How to make your macrame bag
1
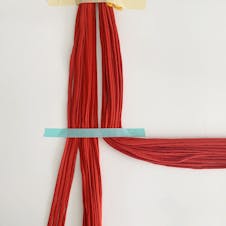
Take all of your 36 strands of yarn and stick the midpoint (where scrap yarn is) onto a table with some masking tape. Measure 25cm down from the midpoint and tape the strands down again.
Ensure your two groups of yarn lengths are kept separated as in the image.
Find your left most four strands of yarn.
2
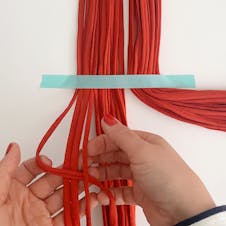
The bag is made up of many square knots. To make a square knot you need to take hold of the 4 strands of yarn and divide it so you have 2 middle lengths and an outer left and outer right length.
Make an ‘L’ shape with the left strand, placing it over the middle two, then place the right strand on top of the bottom of the ‘L’
3
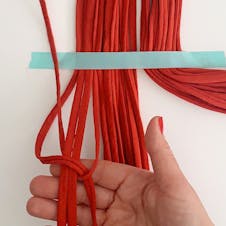
Take the end of the right strand and loop it through the open gap of the ‘L’. By doing this the yarn will wrap under the two middle strands and secure it at the same time.
4
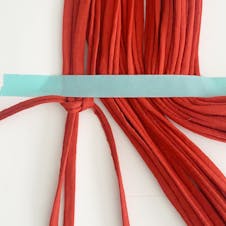
Pull the left and right strands away from each other, taut, so they move up and tighten up to the edge of the tape. Now you’ve finished the first half of your square knot (yay)!
5
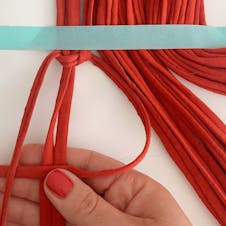
You then need to complete the square knot, which is simply just the reverse of what we’ve already done!
Take the right strand first, make a reverse ‘L’ over the 2 middle strands, and then place the left strand on top of the reverse ‘L’ as in the image.
6
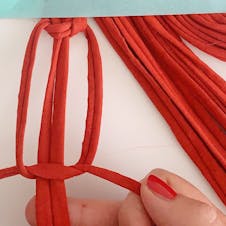
Wrap the left strand behind the two middle strands and up through the centre of the reverse ‘L’.
7

Pull the left and the right strands away from each other, taut, and all the way up to meet the first half of the square knot. Now you have completed your square knot. Continue doing square knots using the next group of 4 strands and then again, and again...
8
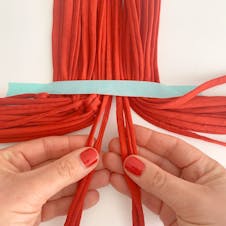
When you get to the end of your first group of strands you will notice you are 2 strands short to make a set of 4.
Join 2 strands from the 2nd group (of 18 strands) and now with 4 strands continue to make a square knot.
Continue all the way along always using sets of four strands.
9
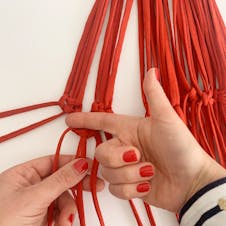
Now we are going to start Row 2!
Set aside the 2 most left strands now as we don’t need them.
10
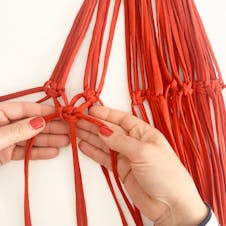
Complete the square knot!
You will see it creates a little flower motif as you’re using 2 strands from each knot in the above row.
11
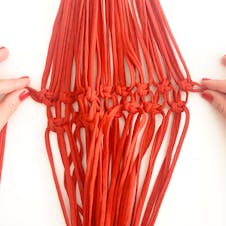
Keep going all the way along remembering to leave the first and last two strands out.
12
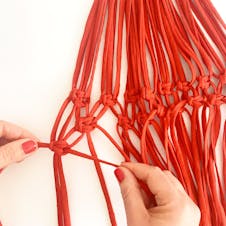
Reintroduce those two strands you left out in the 2nd Row and complete another row of knots.
Once again remembering to leave a fingers width gap between the two rows.
Repeat steps one through 12 again with other side.
13
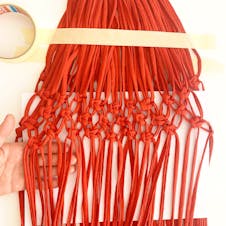
Now we are going to start working on the main body of the bag and join the front and the back of the bag together.
Place a piece of paper between the two layers this way you won’t get confused about which strands belong to which side of the bag.
14
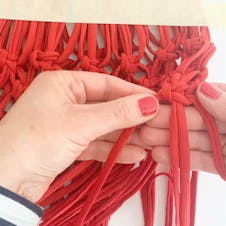
Now we are going to start working on Row 4 and joining the front and the back sides together.
Join the two sides together with the two strands that normally get left out. There will be two from the top bag section and two from the back of the bag section. Continue all the way around now. You will need to continuously flip your bag so you can knot the two sides.
See step 16 I use masking tape on each side for this.
15
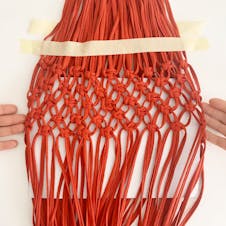
Continue onto Row 5 and 6 the same way that you have been doing, remembering to alternate strands each row (i.e. using 2 strands from each knot above) so we create that pretty netted effect that will keep our shopping safe!
16
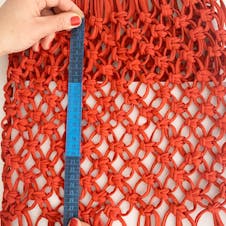
Keep knotting both sides always joining the edges too until your macrame is 28cm long.
At this stage make your next few rows of knots (about 3cm) a lot closer right up to the knot in the previous row as we’re now creating the bottom edge. Step 18 shows a close up of this.
17
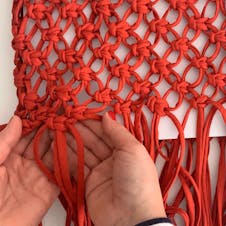
Keep your knots nice and close to the row above for the bottom edge.
18
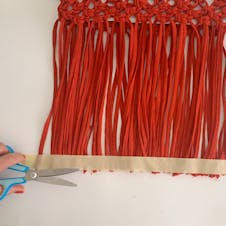
Decide on your tassel length, use masking tape to secure it and give you a straight line to cut across.
19
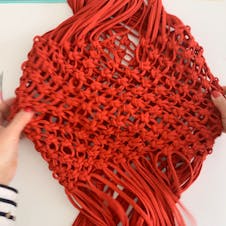
Now it’s time to secure the bottom.
We need to twist the bag to get the straps in the right place. Sounds a little complicated so bear with me :-).
Each hand needs to pinch the centre of the front of the bag and then the centre of the back of the bag. Move and pull your hands away from each other and the bag with now re-shape with your straps still held in the place with your scrap yarn. This image shows my hands pulling away from each other and the fringing in re-adjusting.
You will now you’ve done it right when there is a ‘v’ in the middle of top edge of the the front and back of the bag.
20
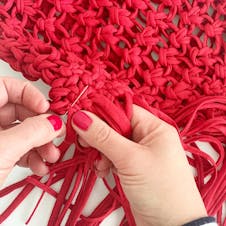
Sew the bottom edge together. I prefer to sew than to knot it together as it allows the fringing to hang flatly. Just use small stitches to sew the front and back together in matching thread.
21

I have swapped to white so you can see this next stage easier
Now we just need to make the 2 straps using a gathering knot on each strap.
Grab one of your scrap yarn tied straps, undo the scrap yarn and take hold of one of your 7m lengths of yarn and place one end about 5cm from where your knots begin. Take it along the edge of the strap until you reach about 5cm to the end of the strap and fold it back up like the image.
22
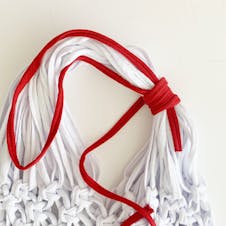
Now take the long end and start wrapping it snuggly around all the cords. Each wrap must fit neatly next to the previous wrap.
23
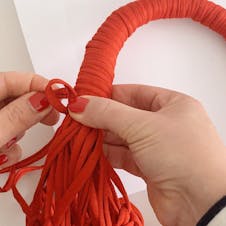
When you get to end, close to the end loop, just insert the end of the yarn into the loop and then pull the tail end on the right that is still poking out (see Step 23). By pulling the tail end, the small loop on the left gets smaller and tucks in under the gathering knots. Once the loop is tucked under and safely secure under the wraps, tie off the excess ends on both sides. Now do the other strap. You’re done!
There are so many different ways to make this shopping bag!
If you like the chic wooden handles of the green bag, use 4inch embroidery hoops and recycled cotton for a stylish and sustainable look.
If your looking for a one handle wonder, the cream version of the bag uses recycled cotton yarn and makes one strap instead of two - perfect to put on your shoulder while you're on the go! Or you could use recycled t-shirt yarn in stead to create the white version of these marvellous macrame shopping bags!
