Crochet a stunning spring shawl with Kate Eastwood, plus bonus baby blanket pattern!
Published on March 22, 2018 By Kate Eastwood 8 min read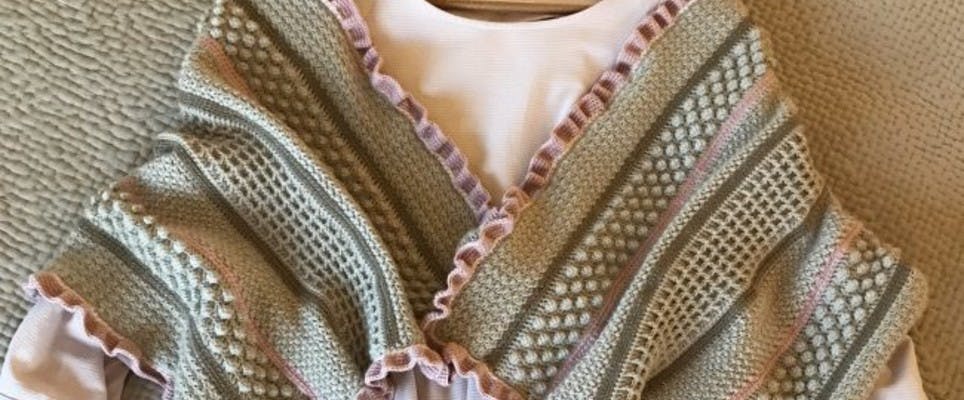
Kate Eastwood’s gorgeous spring sampler shawl is the perfect way to learn new stitches! This beauty is a deep rectangular shawl that includes suzette stitch, bobble stitch, zig zag stitch and waffle stitch, with a pretty ruffled edging! A perfect spring wrap for chilly evenings, morning strolls or even as a beautiful baby blanket! We’ve even got videos to help you master the stitches.
Choose your yarn and colors
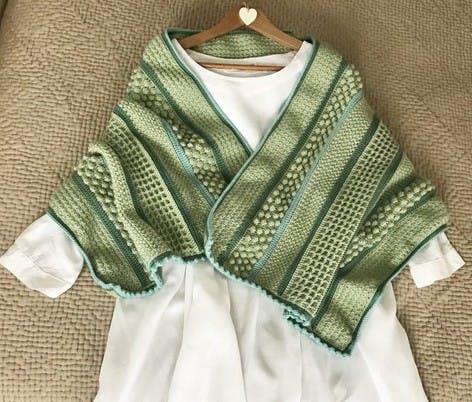
Kate’s design is perfect for DK weight yarn – she’s made her shawl in Willow & Lark Nest, a gloriously soft wool yarn with added cashmere, a luxurious treat for someone special. We’ve made ours in two alternative favourites: Paintbox Yarns Simply DK and Paintbox Yarns Baby DK!
Willow & Lark Nest comes in 10 stunning gentle shades, classic muted, melange and pastel shades for gentle wraps with beautiful drape. Paintbox Baby DK has 25 joyous pastels and brights in an acrylic/nylon blend to choose from, and Paintbox Simply DK gives you a whopping 53 shades to combine for your shawl from neutrals and pastels right through to neon brights!
The fun is in the color choice! Kate’s shawl uses three shades, but you can use a single shade, or as many as you like – the choice is yours! The Spring Sampler Shawl will shine in any color combination.

How much yarn do I need?
In total, you will need approximately 2,300m (2,515 yards) of yarn. Kate has used the same color for all the stitch sections, and two other shades for the dividing lines and ruffle edging.
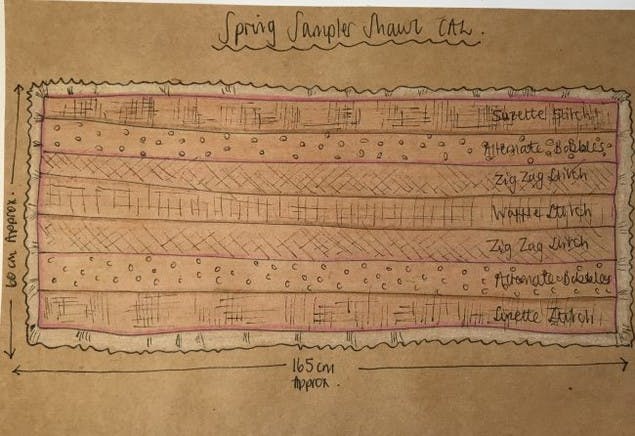
Choose which colors you are going to use for each section of the shawl using this diagram to plan.
For the stitches: 1,500m/1,640 yards
As a generous estimate, we recommend you allow 200m for the Suzette, zig zag and waffle stitch sections, and 250m for the bobble section.
For the Divider strips: 60m (65 yds) per strip
For the Ruffle edging: 350m (382 yds)
Yardages per ball:
Paintbox Yarns Simply DK: 276m (302 yds) / 7 balls for main color, 1 balls for dividers, 2 balls for ruffle
Paintbox Yarns Baby DK: 167m (183 yds) / 9 balls for main color, 2 x balls for dividers, 3 x balls for ruffle
Willow & Lark Nest: 115m (126 yds) / 13 balls for main color, 4 x balls for dividers, 2 x balls for ruffle
If you’d like to make your shawl in Kate's color palette, using Willow & Lark Nest and a 3.5mm hook you will need:
- 13 x balls Sand (for your main color)
- 4 x balls Baby Pink (edging and for divider rows)
- 2 x balls Mushroom (divider rows)
Hooks and tension/gauge
Kate has used a 3.5mm hook with Willow & Lark Nest, I’ve been using a 4mm hook with both Paintbox yarns. The shawl is a gentle throw so there is no gauge specified, but if you know your personal tension is either tight or loose, you may wish to experiment with a swatch to go up or down a hook size before you start. Our yarn estimates are generous to encompass tension differences.
Finished size: approximately 165cm wide, 60cm deep – but everybody’s tension is different, and so this is an approximate guide.
Stitches
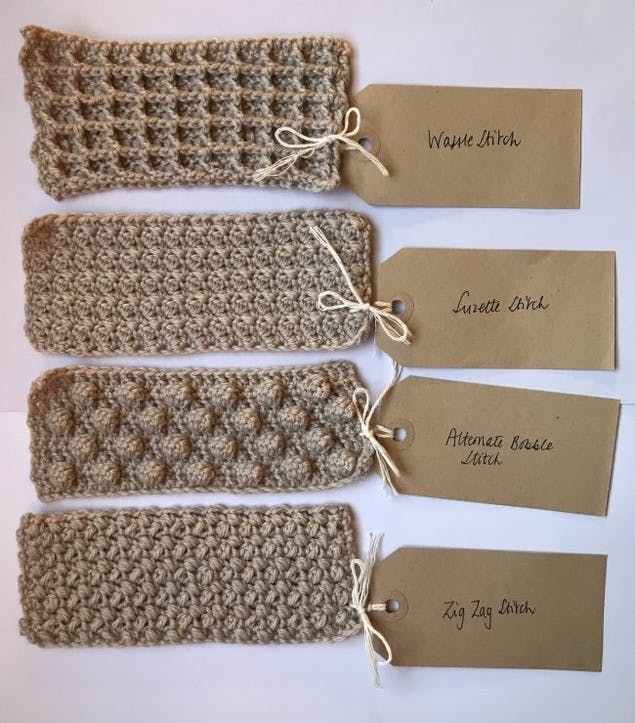
The shawl is worked in four different stitches: Suzette Stitch, alternate bobble stitch, zag zag stitch and waffle stitch. Each stitch works up to give a close but draping texture that makes for the most wonderfully warm wrap. Each row throughout the shawl is 300 stitches To accentuate the width of the shawl the stripes are worked lengthways.
Part 1: Suzette stitch, dividing strip and bobble stitch
For the first part of this CAL we will be working two of the stitch bands and two of the dividing strips. The first stitch band is worked in Suzette Stitch and the second is worked in Alternate Bobble Stitch. The dividing strips can be worked as Option A or Option B.
Part 1A: How to crochet the Suzette stitch
1
Let's get started. Using your chosen yarn with the correct hook size work a chain of 300. The first stitch band is worked in Suzette Stitch as follows.
2
For row 1. Starting in the second chain from the hook *work a DC and TR (SC and DC US) in to the same stitch. Skip a stitch* and repeat from * to * to the end of the row, making your last stitch a DC (SC US). Chain 1 and turn. 299 sts.
3
For row 2. Work a DC and a TR (SC and DC US) in to the first stitch. *Skip a stitch and work a DC and TR (SC and DC US) into the next stitch.* repeat from * to * to the end of the row, making the last stitch of the row a DC (SC US). Chain 1 and turn.
4
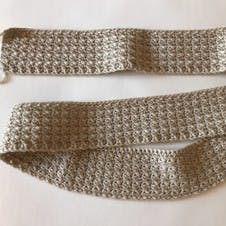
Repeat and Finish. Repeat rows 1 and 2 four times. 299 sts. Finish off.
Part 1B: How to work the dividing strip
You have 2 options for the dividing strip. Option A, which was used for the sand and pink shawl, a rope stitch and double crochet band. Option B, which was used for the green shawl is a band of double crochet.
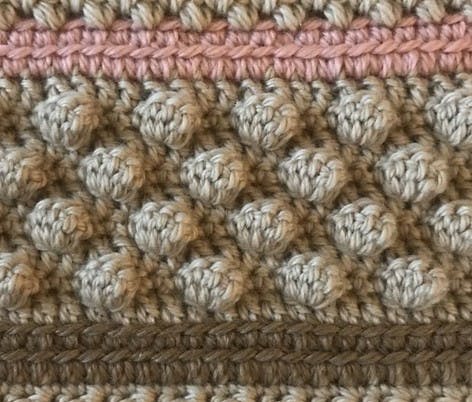
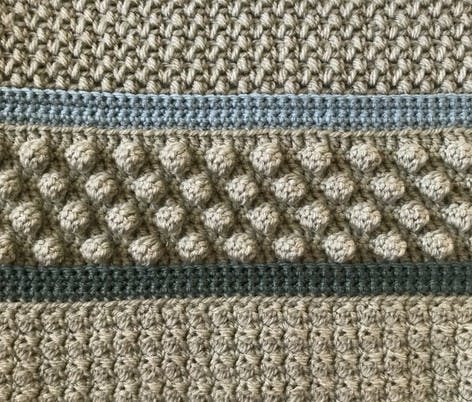
Part 1B: Divider Option A
1
For row 1. With the right side of your work facing you, join in your new color at the top left hand corner of your work. Working in to the back loops only, work a row of Rope stitch (DC (SC US) worked from left to right). We need to increase the stitch count to 300 along this row – do this by working two rope stitches into one stitch, anywhere along the row. At the end of the row chain 1 but do not turn. 300 sts.
2
For row 2. Work along the row, from right to left as usual, working DC (SC US) on top of your row of the Rope Stitch. 300 sts. At the end of the row chain 1 but do not turn.
3
For row 3. Working in to the back loops only, work a row of Rope stitch. 300 sts. At the end of the row chain 1 but do not turn.
4
For row 4. Work along the row, working DC (SC US) on top of the row of Rope Stitch. 300 sts. At the end of the row finish off.
Part 1B: Divider Option B
1
For row 1. With the right side of your work facing you, join in your new color at the top right hand corner of your work. Working in to the back loops only, work a row of DC (SC US) – and because we need the stitch count to come back to 300 sts, work TWO DC (SC US) into one of the stitches anywhere along this row. At the end of the row chain 1 and turn. 300 sts.
2
For row 2. Work a row of DC (SC US) 300 sts. At the end of the row chain 1 and turn.
3
For rows 3 and 4. Repeat Row 2. Finish off at the end of Row 4. 300 sts.
Part 1C: Alternate Bobble Stitch
1
To get started. To make a bobble, work 4 TR (DC US) all into the same stitch, leaving the last loop of each stitch on the hook. You will now have 5 loops on your hook. Yarn over and pull through all 5 loops.
2
For row 1. With the right side of your work facing join in the color for the stitch band at the top right hand corner and chain 2. Working in to the back loops only and starting in the first stitch, work a row of TR (DC US). 300 sts. At the end of the row chain 1 and turn.
3
For row 2. This is Bobble Row 1. Now working in to both loops again as usual, DC (SC US) 2. Make a Bobble in the next stitch. *DC (SC US) 3, make a bobble.* Repeat from * to * to the end of the row. The last 2 stitches of the row will be DC (US SC). 300 sts. At the end of the row chain 2 and turn.
4
For row 3. Work a TR (DC US) into each stitch all the way along the row. 300 sts. At the end of the row chain 1 and turn.
5
For row 4. This is Bobble Row 2. DC (SC US) 4. Make a bobble in the next stitch, DC (SC US) 3. Repeat from * to * to the end of the row. The last 4 stitches of the row will be DC (SC US). 300 sts. At the end of the row chain 2 and turn.
6
For row 5. Work a TR (SC US) into each stitch all the way along the row. 300 sts. At the end of the row chain 1 and turn.
7
Repeat, finish, join. Repeat rows 2 to 5. 300 sts. Finish off. With the right side of your work facing you, rejoin your yarn for the dividing strip and work either Option A or Option B.
Part 2: Zig zag stitch and waffle stitch
For this part of the CAL we will be working a further two stitch bands and two more dividing strips: the first band is worked in Zig Zag stitch and the second is worked in waffle stitch. Once you’ve completed these, you will then be able to finish the second half of the shawl as the last three stitch bands are repeats of band 1 in Suzette Stitch, band 2 in Alternate Bobble Stitch and band 3 in Zig Zag Stitch.
Part 2A: How to work the zig zag stitch
1
To get started. With the right side of your work facing, re-join your yarn at the top right hand corner. For row 1, working in to the back loops only, work a row of DC (SC US). 300 sts. Finish off.
2
For row 2. Re-join your yarn at the right hand corner of your work. Chain 2. Starting in the second chain from the hook ,* insert your hook and pull up a loop, yarn over and pull up loop, yarn over and pull through all 4 loops on your hook. Chain 1. Skip a stitch and repeat from * to * to the end of the row, making the last stitch of the row a DC (SC UK). Chain 2 and turn.
3
For row 3 and to finish. Starting in the first stitch, work a row of Zig Zag stitch as in Row 2. Finish the row with a DC (SC US), chain 2 and turn. Work a total of 10 rows of Zig Zag stitch. Now work a final row of DC (SC US). Check that your stitch count is correct at this point and if need be increase/decrease as necessary. 300 sts. Finish off.
Part 2B: Dividing band
1
Add a dividing band. Re-join your yarn and work a Dividing Band. 300 sts. Instructions above in part 1.
Part 2C: How to work the waffle stitch
1
To get started. Re-join your yarn at the right hand corner of your work (right side facing). For row 1, work a row of TR(DC US). 300 sts. Finish off at the end of the row.
2
For row 2. With right side facing, Rejoin yarn at right hand top corner with a 2 chain. Work 1 TR (DC US). * Work a FTR (FPDC US) followed by 2 TR (DC US)*. Repeat from * to * to the end of the row, with your last stitch being a TR (DC US). 300 sts. Chain 2 and turn.
3
For row 3. Work 2 TR (DC US) followed by 2 BTR (BPDC US). * Then work 1 TR (DC US) and 2 BTR (BPDC US)*. Repeat from * to * to the end of the row, ending the row with 2 TR (DC US). 300 sts. Chain 2 and turn.
4
Repeat and finish. Repeat Rows 2 and 3 four times. Repeat Row 2. Work a row of DC (SC US). 300sts. Finish off.
Part 2D: Dividing band
1
Add a dividing band. Re-join your yarn and work a Dividing Band. 300 sts. Full instructions are above in Part 1.
Keep it up
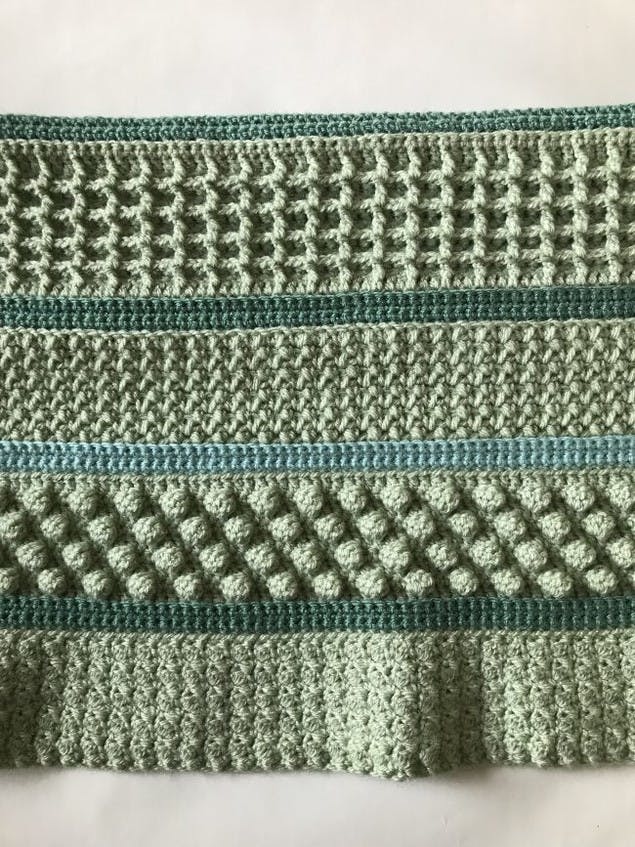
At the end of this part of the CAL your work will be looking like the picture below, and you have now reached the middle band of the shawl. The next stage is to repeat three of the stitch bands that you have already worked, starting with a band of Zig Zag Stitch, followed by another band of Alternate Bobble Stitch and finishing with a band of Suzette Stitch.
Part 3: Ruffle, bobble and straight borders
Today we will be working on the final touches to your shawl by finishing off the edges with a border. I have included instructions for three different types of border so that you can choose the one you prefer. Border 1 is a soft ruffle that is worked around the whole shawl. Border 2 is a much simpler edging of several rounds of DC (SC US), again worked around the whole shawl, that gives the shawl a flat, crisp finish. Border 3 is similar to Border 2 in that the main edging is rounds of DC (SC US), but to add detail, each of the two shawl ends are finished with a row of small bobble edging.
Border 1: Soft Ruffle Edging
1
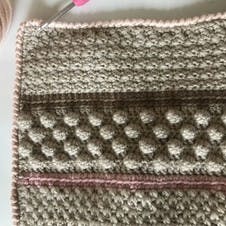
For round 1. To begin the border work a round of DC (SC US) evenly all the way around the edge of your shawl, working 2 extra stitches at each corner. Sl St to join at the end of the round. Finish off here if you are working your ruffle in a different color.
2
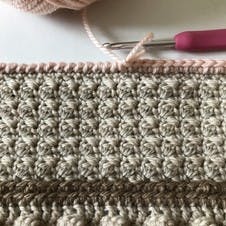
For round 2. Work a round of Rope stitch all the way around the edge of the shawl, join with a Sl St at the end of the round. Chain 1.
3
For round 3. Work a round of DC (SC US) over the top of Round 2, working 2 extra stitches at each corner. Join with a Sl St at the end of the round and chain 1.
4
For round 4. In this round you are going to increase the number of stitches so that the next few rounds will create a ruffle. Working in to the back loop only,* DC 2 (SC US 2) in the next stitch, followed by 3DC (3SC US) in the next stitch.* repeat from * to * all the way around. Join with a Sl St at the end of the round and chain 1.
5
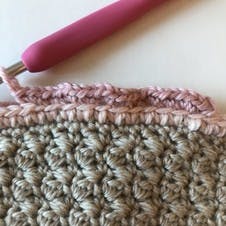
For rounds 5 to 8. Now working in to both loops again as normal, continue working rounds of DC (SC US). Join each end of round with a Sl St and chain 1. On the final round, join with a Sl St and finish off. Sew in all the ends.
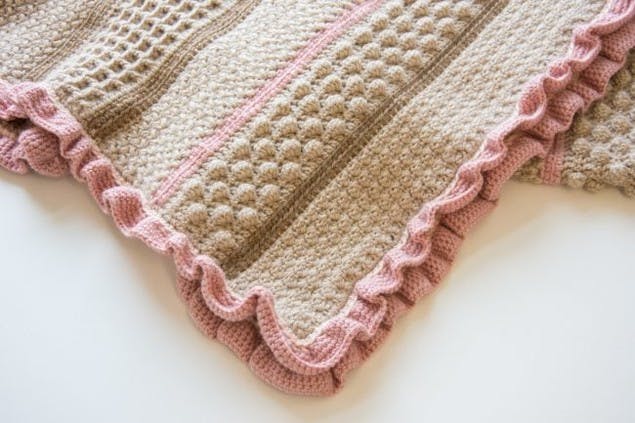
Border 2: Flat Edging
1
For round 1. To begin the border work a round of DC (SC US) evenly all the way around the edge of your shawl, working 2 extra stitches at each corner. Sl St to join at the end of the round. Chain 1.
2
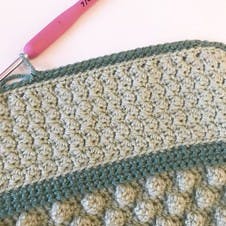
Rounds 2 to 5. Working in one continuous color or alternating with two colors, work 4 further rounds of DC (SC US) as for Round 1, working 2 extra stitches at each corner. Join the end of each round with a Sl St and chain 1 before starting the next round. Finish off and sew in the ends.
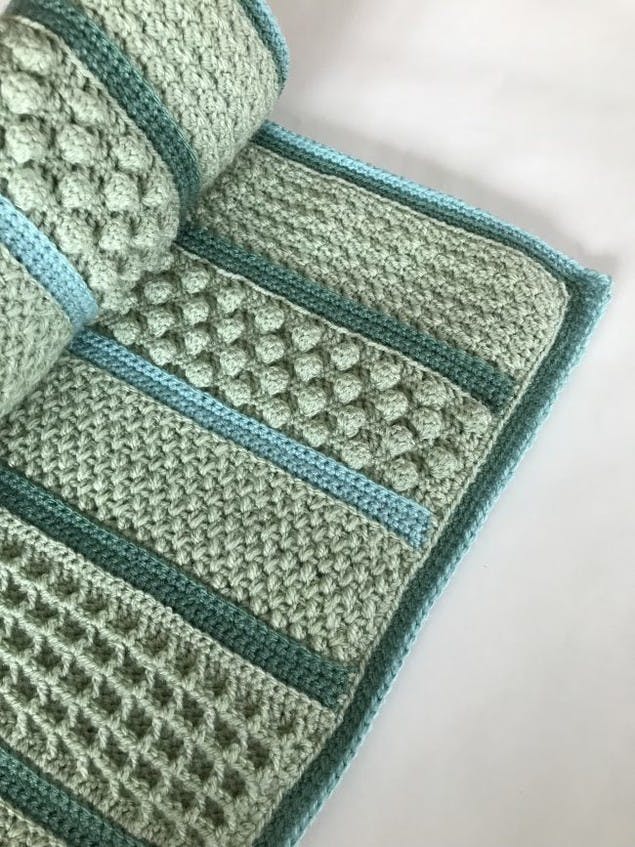
Border 3: Flat edging with bobble edging
1
For rounds 1 to 5. Work as for Border 2. Finish off and sew in the ends.
2
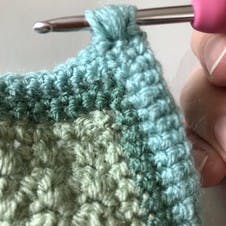
For bobble edging. With the wrong side of the shawl facing you, re-join your yarn with a Sl St at the right hand corner of one of the ends. *You are now going to work your first bobble in to this same stitch as follows: Yarn over and pull up 4 times. You now have 9 loops on your hook. Yarn over and pull through all the loops on the hook. Sl St in to the next 2 stitches.*
3
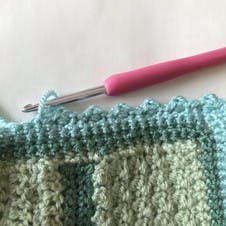
Next. Sl St in to the next stitch and repeat from * to * to the end of the row. As you work along the row you will see the bobbles forming on the right side of your work. Finish off and sew in the ends.

That's it! Your spring sampler shawl is complete! If you'd like to learn how to adapt this pattern to make a snuggly baby blanket, then read on.
The Spring Sampler baby blanket edit
Several of you asked along the way, if the Spring Sampler Shawl could be made as a baby blanket – well here it is! When complete, my baby blanket measures 80cm x 100cm, but if you want to make a larger blanket you can increase the number in the starting chain and work it to the size you require. The number for your starting chain needs to be divisible by 2, 3 and 4 so that all of the stitch patterns will work out correctly. The first stitch band in Suzette Stitch will leave you with an odd number but this is increased back to your starting chain number in the first Dividing Band. (See pattern details below.)
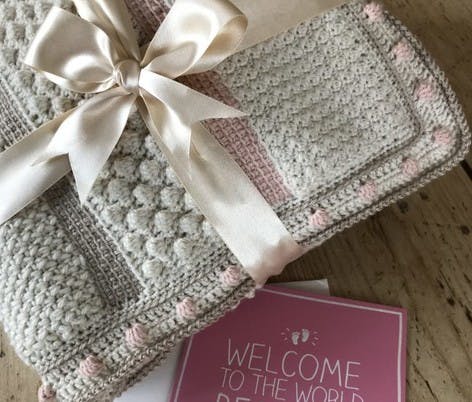
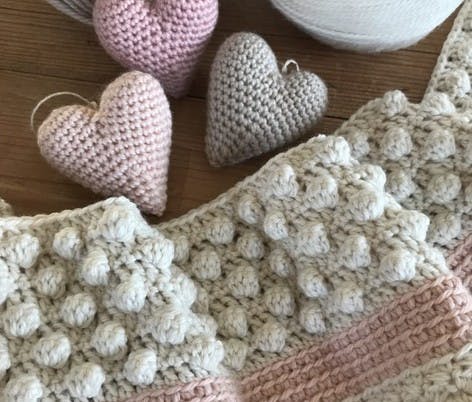
The basic pattern of the blanket is the same as the shawl in that it is made up of different stitch bands with dividing strips worked between the different sections. I worked the same stitches – Suzette stitch, alternate bobble stitch, zig zag stitch and waffle stitch but because the blanket needs to have different dimensions to the shawl I worked more rows in each stitch to create deeper bands. Again, if you wanted to make a longer blanket you could either repeat the stitch bands several times or make each stitch band deeper with more rows of each stitch.
I also increased the depth of the dividing strips by working eight rows rather than four, as in the shawl.
For my blanket I used Willow & Lark Nest and worked with a 3.5mm hook.
I used:
Color A: 14 x balls of Milk - this color is now unavailable so we suggest using Baby Pink (222) as a substitute.
Color B: 3 x balls of Fondant Pink (220)
Color C: 3 x balls of Sand (205)
I worked all of my stitch bands and part of the border in Color A, and the total yardage used for this came to 1,750 yds.
I worked 4 of the dividing strips and the bobbles for the edging in Color B, and the total yardage for this came to 375 yds.
I worked 3 of the dividing strips and part of the border in Color C, and the total yardage for this came to 375 yds.
The blanket would work up just as well in Paintbox Yarns Simply DK, you will need:
- For the stitch bands 1,750 yards = 7 balls
- For the dividing strips and bobble edging, 375 yards = 2 balls
- For the dividing strips and partial border, 375 yards = 2 balls
The blanket pattern
1
For stitch Band 1. Chain 156. Work 19 rows of Suzette Stitch, 155 sts. Finish off.
2
Dividing Band 1. With right side facing, join your yarn at the top right hand corner and work 8 rows of either Dividing Band Option A or Option B. In the first row increase once to take your stitch count back to 156. Finish off.
3
Stitch Band 2. With right side facing, join your yarn at the top right hand corner and work Rows 1 to 5 of Alternate Bobble Stitch, 156 sts. Repeat Rows 2 to 5 until you have a total of 7 bobble rows, ending with a Row 5. Finish off.
4
Dividing Band 2. With right side facing, join your yarn at the top right hand corner and work 4 rows of either Dividing Band Option A or Option B, 156 sts. Finish off.
5
Stitch Band 3. With right side facing, join your yarn at the top right hand corner and work Rows 1 to 3 of Zig Zag Stitch. Work a further 17 rows of Zig Zag stitch (row 3 below) followed by a row of DC (SC US).
6
Dividing Band 3. With right side facing, join your yarn at the top right hand corner and work 4 rows of either Dividing Band Option A or Option B, 156 sts. Finish off.
7
Stitch Band 4. With right side facing, join your yarn at the top right hand corner and work Rows 1 to 3 of waffle stitch. Repeating Rows 2 and 3, work a further 12 rows of waffle stitch. Now work a row of DC, 156 sts.
8
Dividing Band 4. With right side facing, join your yarn at the top right hand corner and work 4 rows of either Dividing Band Option A or Option B, 156 sts. Finish off. You are now at the central point of the blanket.
Continue working the blanket by repeating Stitch Band 4 and a Dividing Band, Stitch Band 3 and a Dividing Band, Stitch Band 2 and a Dividing Band and then finish with Stitch Band 1. Finish off and sew in the ends.
9
Add your border. Choose any of the border options from the shawl pattern above and crochet away. And voila, you have yourself a beautiful baby blanket to keep for your own little one or gift to a friend.

