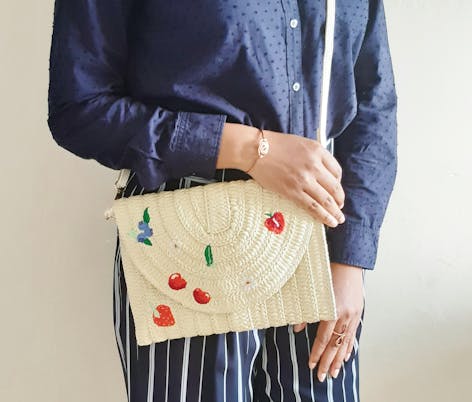
Stitch a summer berries bag - free tutorial!
Published on April 30, 2021 1 min readFreshening up your summer accessories with a bit of stylish stitching has never been easier! Embroidery artist Shikira shows you how to make the most out of your closet by embellishing plain accessories, like a straw clutch bag, with some sweet summer berries.

Materials
- Summer Berries in DMC - PAT0610 - Downloadable PDF
- DMC 6 Strand Embroidery Floss
- DMC Thread in colours: 23, 3801, 498, 18, 3838, 158, 13, 909
- Hemline 16 Embroidery/Crewel Needles (Sizes 3-9)
- Straw clutch bag
- Dressmaker pins
- Greaseproof paper
- Pencil
- Clover Open Sided Thimble - Medium
- Milward Rose Gold Stork Embroidery Scissors (11.5cm/4.5in)
- Hemline Plastic Needle Threader
- Thimble
- Needle threader
- Embroidery needle
A variety of stitches are used in this tutorial, need to brush up on your technique before you start stitching? Check out our embroidery stitch library for some handy how-tos! You'll need to know:
- Split stitch
- Fishbone stitch
- Long and short stitch
- French knot
Download the pattern!
How to make your summer berries bag
1
Begin by printing off your downloaded template from the LoveCrafts website. Using your greaseproof paper and pencil, trace the Summer Berries template.
2
Roughly cut each pattern out. Arrange the pieces as you’d like. Using your pins, carefully pin each pattern to the bag using just 1 or 2 pins.
3
From here you can begin to stitch each pattern in any order you like. I started with the strawberry with yellow seeds. Reference your color diagram and stitch chart which is pages 1 and 3. Use 2 strands of DMC colour 13 and thread your needle.
Begin stitching the strawberry leaves using the long and short stitch and stitching through the tracing paper. The long and short stitch is similar to the satin stitch but using different length stitches. Continue to build up the color until you fill the whole area. You will also benefit from using a thimble to help you pull the needle through this very tough fabric surface.
Pro Tip
Before beginning a new pattern check page 1 which is your colored diagram. For example, the strawberry is A2. Stitches are labelled A-D and colors are labelled 1-8. So the strawberry is A – Long and short stitch, with 2 – colour thread 3801. You’ll need to reference page 1 often and remember you will use only 2 strands for the whole design.
4
Once the leaves are complete, change thread color to 3801 with 2 strands. Again you are going to fill the strawberry using the long and short stitch. I recommend you start filling the outline first.
5
Once the outline of the whole strawberry is full you can now gently remove the greaseproof paper. Because you have stitched the outline it should tear away really easily. Now continue filling your strawberry.
6
I always find it hard to fill in and stitch the same area for a long period. To keep me going I just start stitching another pattern and return to any unfinished parts after.
7
After stitching the outlines and filling the areas of the other patterns with long and short stitch, moving along from strawberries, blueberries, blossoms and cherries. I then removed the excess greaseproof paper from around them all.
8
Once all the greaseproof paper is removed from the main parts of the patterns you can then look at touching up any outlines by adding a few extra stitches.
9
You can now reference the diagram to begin stitching using another color and stitch. I began stitching any leaves to the patterns which used a fishbone stitch, starting with the blueberries. I also change my color thread to dmc 909 or 13 depending on the requirement. I also added the details to the flowers.
10
Moving on, I removed anymore remaining greaseproof paper from the patterns. All that is left to complete is details to the cherry and strawberry using a split stitch. Again reference the diagram for the correct thread color.


