Learn how to thrum with Juliet Bernard
Published on 19 November 2020 By Merion 3 min readWhen really cold weather bites, you can't beat some extra yarny ballast to your mittens, hats and slippers. Thrumming is a technique that dates back to the Elizabethan times - adding slivers of woolly fibre to your stitches to add a layer of super shaggy warmth! Juliet Bernard has the scoop on how to thrum with her super easy tutorial!
Thrumming? If you've never heard of it, the chances are you might not have ever been cold enough! Thrumming, the technique of adding a tufts of wool roving on the inside of stitches, is a reasonably old tradition that began, it seems, with Elizabethan sailors. A thrummed cap was the 17th century latest technology to keep working men warm, and was also used for blankets, and probably mittens too.
Thrumming has been a tradition as far back as anyone can remember in Newfoundland and Labrador, where the temperatures drop well below freezing every winter - and mittens are often chock full of tufty wisps of roving that really make a difference to keeping your hands warm. Eventually all these wisps of wool begin to felt together and this creates an even warmer lining.

You can add thrums to knit and crochet projects, by incorporating the little thrums into stitches regularly - but be mindful of sizing - once a mitten is full of thrums, there might not be room for your hand, so be prepared to go up a size!
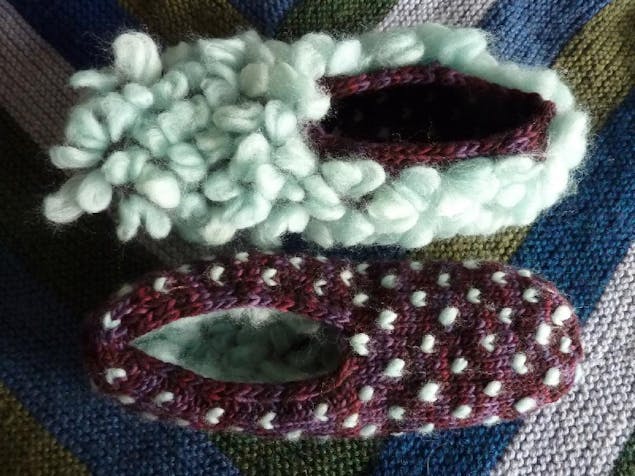
For the purposes of her video, Juliet has used a gorgeous pattern, the Safari Slippers, by Jennifer Lee to illustrate how to thrum. The pattern does not include thrumming detail, but these are the slippers that Juliet uses in the video, to show you how you can add thrumming to any pattern!
Roving is unspun wool fibre that you can tease into little tails to create thrums inside your weather beating mitts, hats and slippers! You can choose a natural shade, or some super bright pops of colour - there are lots of different shades to choose from and it's a fun way to introduce a contrast colour to your project.
Materials
- Clover Natural Wool Roving
- Debbie Bliss Cashmerino Aran
- Rico Sock Stop
Juliet says...
When preparing the fleece, pull gently until you can pull a little away. If you want a short thrum simply twist and set aside. For a longer thrum gently stretch the fibre you have pulled out to lengthen, then twist.
When you knit in the thrum, put your right needle in to the next stitch, wrap the thrum round your right needle and knit together with the stitch.
I loved working thrums into the Safari Slipper pattern. It’s worth doing a tension square because the thrums do pull your work in a bit, and you might find you need to go up a size.
For the base:
I added my first row of thrums on row 2. K1, *add thrum on next st, k3. Repeat from * as many times as you can depending on the size you are making. Then I added thrums on every following 4 th row alternating their position.
For the tongue:
I started adding thrums on the first knit row after the 3 rows of garter stitch and every following 4 th row, just like the base.
You can add thrums to any pattern for mittens, gloves and hats to give you an extra layer of warmth. Now all you have to do is wait for winter!"


