Learn how to satin stitch with our embroidery tutorial
Published on 8 October 2021 2 min readSatin stitch is a simple embroidery stitch used to fill small areas with smooth, flat stitches. An essential skill for both embroidery newbies and seasoned stitchers, here we show you how to master the satin stitch with an easy step-by-step tutorial.
Satin stitch embroidery will make an excellent addition to your repertoire of embroidery stitches! It’s super simple to pick up, and once you’ve got the hang of it you’ll find that you can fill in the bigger parts of embroidery patterns in no time at all.
When stitch the satin stitch, you might find that it’s easier to use linen or cotton fabric as opposed to evenweave. The grid-like nature of evenweave creates a stepped effect, making it difficult to achieve a smooth finish on the area you’ve filled. You can still use evenweave fabric to create the illusion of curves by using satin stitch with gradual increases and decreases in stitch length.
Materials
- Elbesee 4 inch (10.16 cm) Wooden Embroidery Hoop
- Hemline Embroidery/Crewel Needles - Size 3-9
- Fiskars Classic Embroidery Scissors
- Prym Aqua Marking Pen Water Erasable White
- Zweigart 32 Count Belfast Linen 27in x 39in
- DMC Stranded Cotton
Prepare to satin stitch
Satin stitch is used to cover an area completely. Whatever the shape, just adjust the length of each stitch to fill in the area you want. For beginners, practice the satin stitch with a small square - a simple shape to give this stitch a go!
Getting started
Stretch the fabric in place in the embroidery hoop. Thread your needle and tie a knot in the end of the thread. We’ve used three strands of cotton in this example, but you could use six for a thicker satin stitch to fill in larger areas. Draw a few squares using an erasable pen to use as a guide for practising the satin stitch.
How to satin stitch
1

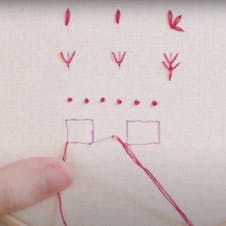
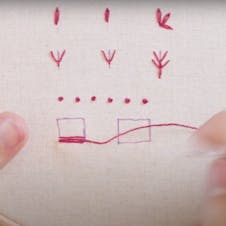
Bring the needle up through the fabric at the starting point of the area, in this case the bottom left corner of the square. Take the needle back down at the opposite side of the shape you’re filling (the bottom right corner of the square here). The thread should lie flat to the surface of your canvas.
2

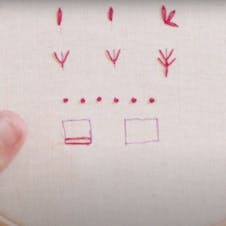
Bring the needle back up through the canvas just above where you finished your stitch, and take it back down above where you first brought the needle up.
3

Go back on yourself, filling in the gap between the first stitch and the second stitch.
4

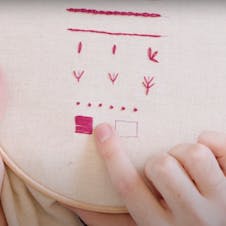
Repeat these steps, creating side-by-side stitches, until you’ve filled in the entirety of the square with lovely, flat, seamless satin stitches.
Pro Tip
When working in satin stitch, keeping the tension even is vital to creating a beautiful flat finish. The more you practice, the neater your stitches will become.
Practice satin stitch with our fab free embroidery patterns

DMC Golden Daisy - PAT1352S - Downloadable PDF

Summer Berries in DMC - PAT0610 - Downloadable PDF

DMC Thistles - PAT1355S - Downloadable PDF

Stripey Feather in DMC - PAT0048 - Downloadable PDF

Apples in DMC - PAT0501 - Downloadable PDF

Moon In My Hands in DMC - PAT0734 - Downloadable PDF