The Crochet Girl Gang blanket CAL
Published on 30 November 2016 By Merion 7 min read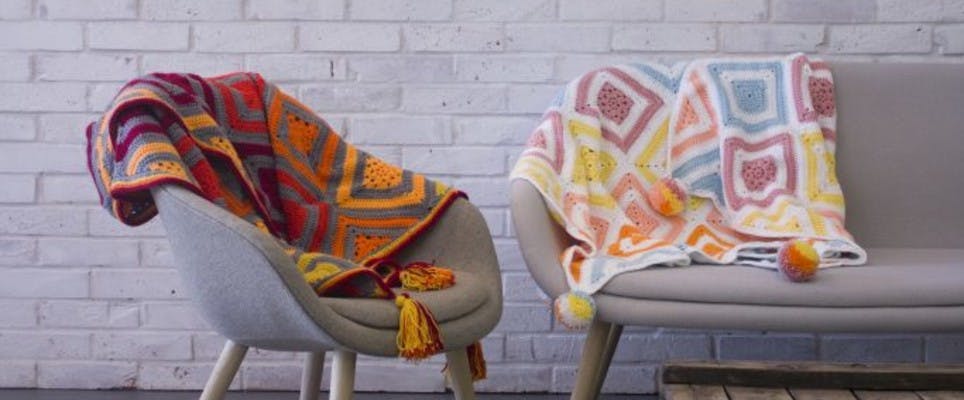
We’re thrilled to introduce the Crochet Girl Gang blanket CAL with Paintbox Yarns. Join us for a fabulous crochet-along with Potter & Bloom and Steel & Stitch!
Bloggers and crochet designers Emma Potter from Potter & Bloom, and Emma Friedlander-Collins from Steel & Stitch have joined creative forces to design a thoroughly modern crochet blanket that will look deliciously stylish draped across your sofa.
Join our crochet-along with Paintbox Yarns and learn how to crochet different kinds of granny squares, from simple stitches to cables, special stitch borders, tassels and multi-colour pom poms.
The blanket
The fabulous blanket is crocheted in Paintbox Yarns Simply Aran using a 5mm hook. It measures 64″ x 38″ (162 x 96 cm) and you can choose from two borders, with pom-poms or tassels.
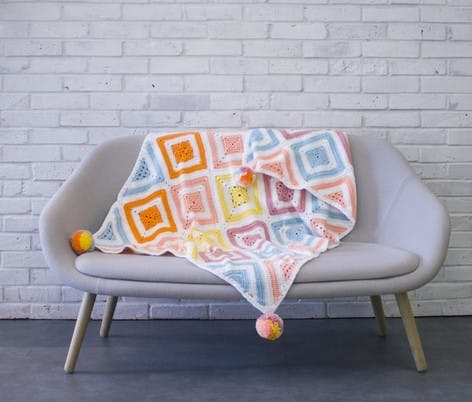
Emma Potter of Potter & Bloom has chosen a sweet pastel palette (pictured on the left) with gentle sherberts, perfect pinks and a pom pom edge!
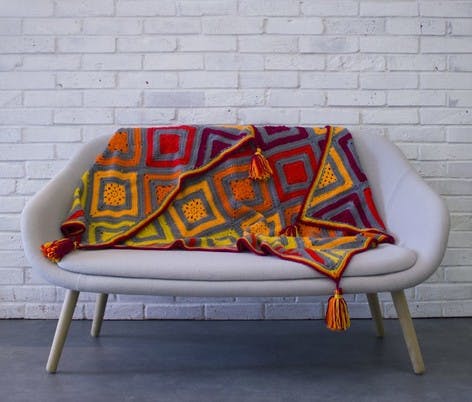
A tumble of autumn leaves has inspired Emma Friedlander-Collins from Steel & Stitch, with rich, warm reds and oranges and a flourish of tassels in her colour palette (pictured on the right).
What you’ll need
Dreamily pastel, Emma Potter’s zesty sherbert shades are brought to life with an injection of orange and winter white. This blanket is at home in a modern home or nursery, with fun multi-coloured pompoms at each corner. To make this colour palette, you'll need two balls each of Paintbox Yarns Simply Aran in: Seafoam Blue, Peach Orange, Blush Pink, Daffodil Yellow and Seville Orange (Note: this was Mandarin Orange, but this has now been discontinued), and six balls of Paper White.
Toasty warm autumn tones are Emma Friedlander-Collins’ inspiration to celebrate the season. Cleverly blended with a deep grey, mustard, orange and reds make this the cosiest blanket ever. To make Emma's autumnal blanket, you'll need two balls each of Paintbox Yarns Simply Aran in: Mustard Yellow, Seville Orange (Note: this was Mandarin Orange, but this has now been discontinued), Blood Orange, Rose Red (Note: this was Tomato Red, but this has now been discontinued) and Red Wine, and six balls of Slate Grey.
You will need a 5mm crochet hook and tapestry needle for sewing up, and if you’d like to add Emma Potter’s gorgeous pom poms, a pom pom maker too!
Pick your palette
Create your own colourway! The beauty of Paintbox, is that you can pick your own palette from the 55 fabulous shades in the Paintbox Yarns Simply Aran range. You'll need five accent colours for the CAL, plus one signature colour to border the squares.
Inspired by the beach? Choose aqua tones, sea greens and sandy yellows. Love the Northern Lights? Build a night sky shot through with neon green and purple hues. Monochrome? Naturals? Princess pinks? With a whole paintbox rainbow to choose from, you can create your dream colourway.
Skill level
The Crochet Girl Gang CAL is ideal for beginners and adventurous beginners. You will learn how to crochet granny squares with different central motifs using standard crochet stitches plus borders and sewing up.
Part 1: Circle square and circle triangle
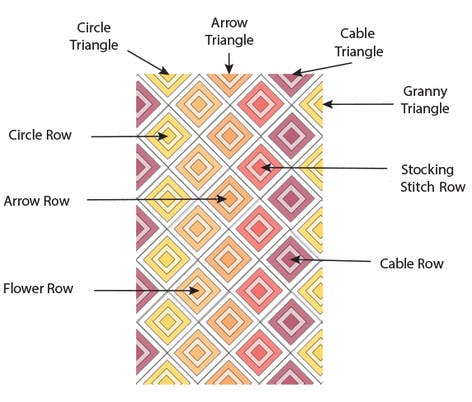
If you’ve just joined us the Crochet Girl Gang CAL blanket is made up of five gorgeous motifs inside granny square and triangle shapes, which are then joined to form the final blanket.
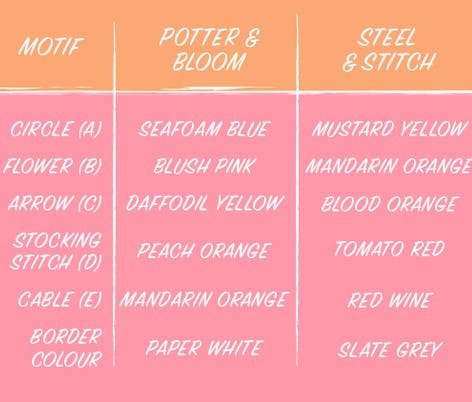
For those of you who have your yarn and are ready to get started, your first task is to assign your shades to each of your motifs! If you’re using one of the colour palettes from Potter & Bloom or Steel & Stitch, you can either follow their chosen shades for each motif, or mix them up! If you’ve picked your own palette, just assign your shades to each motif using our chart below, so that when the pattern refers to Colour A, Colour B, Colour C and so on, you’ll know which shade to use.
It’s important that you look at the order of the shades next to each other so that you are happy with the order they will appear in your blanket!
Part 1A: How to crochet the circle square
1
To get started. Using Colour A, ch4, join with a ss to form loop. Then for round 1, ch3, 13tr into loop, join with a ss to top of beginning ch3 (14tr).
2
For round 2. Ch3, 1tr in same place as ch3, 2tr in each st around, join with a ss to top of beginning ch3 (28tr).
3
For round 3. Ch3, 5tr, (3tr, 2ch, 3tr) into next tr, *6tr, (3tr, 2ch, 3tr) into next tr; repeat from * around and join with a ss to top of beg. Ch3. Break off yarn.
4
For round 4. Join border colour into any corner, ch3, (1tr, 2ch, 2tr) in same place, 1tr in each st working (2tr, 2ch, 2tr) into each corner space, join with ss to top of beginning ch3.
5
For round 5. Ch3, 1tr in each st working (2tr, 2ch, 2tr) into each corner space, join with a ss to top of beginning ch3, Break off yarn.
6
For round 6. Join colour A into any corner, ch3, (1tr, 2ch, 2tr) in same place, 1tr in each st working (2tr, 2ch, 2tr) into each corner space, join with ss to top of beginning ch3.
7
For round 7. Ch3, 1tr in each st working (2tr, 2ch, 2tr) into each corner space, join with a ss to top of beginning ch3. Break off yarn.
8
For round 8. Join border colour into any corner, ch3, (1tr, 2ch, 2tr) in same place, 1tr in each st working (2tr, 2ch, 2tr) into each corner space, join with ss to top of beginning ch3. Break off yarn. Once finished, repeat! You will need 4 of these in total.
Part 1B: How to crochet the circle triangle
1
To get started. With colour A, ch4, join with a ss to form loop. Then for round 1, ch4, 7tr, ch1, 1tr into the loop, turn.
2
For round 2. Ch4, 2tr in sp, 2tr in each tr around, 1tr in sp, ch1, 1tr in top of turning ch, turn.
3
For round 3. Ch4, 2tr in sp, 1tr in next 8tr, (2tr, 3ch, 2tr) in next tr, 1tr in next 8tr, 2tr in sp, ch1, 1tr in top of turning ch, turn. Break off yarn.
4
For round 4. Join Border Colour in top of last tr worked, ch4, 2tr in sp, 1tr in every st working (2tr, 2ch, 2tr) in top st, 2tr in space, ch1, 1tr in top of turning ch, turn. For round 5, repeat row 4. Break off yarn.
5
For rounds 6 & 7. Join colour in top of last tr worked and repeat row 4. Break off yarn at end of Round 7.
6
For round 8. Join White in top of last tr worked and repeat row 4. Break off yarn. Once finished, repeat! You'll need 2 of these.
Part 2: The flower square
Are you ready for part two? This week, we’re adding the next line up of squares, with Emma Potter’s flower square! Crochet is the perfect craft for creating flowers, and this week, you’ll be learning how to work the cluster stitch to create petals.
Part 2: How to crochet the flower square
1
To get started. With Colour B ch4, join with a ss to form loop. For round 1, ch4, 1tr, 1ch into the loop, *1tr, 1ch into the loop; repeat from * until you have 7 spaces, ch1 and join to 3rd of beg 4ch (8 spaces).
2
For round 2. Ss into next space, ch3, 3tr cluster (*yarn round hook (yrh), into space, yrh and pull up a loop, yrh and through 2 loops, repeat from * twice more, yrh and through all loops on hook), ch3, 4tr cluster in next space (same as instructions for 3tr cluster but repeat actions four times), ch3, repeat around, join with a ss to top of beg. ch3.
3
For round 3. Ss into next space, ch3, 2tr, 2ch, 3tr into same space, ch1, 4tr into next space, ch, *(3tr, 2ch, 3tr), ch1, 4tr, ch1; repeat from * around and join with a ss to top of beg. Ch3. Break off yarn (You should have 12 stitches across each side of your square, with two chains in each corner).
4
For round 4. Join border colour into any corner, ch3, (1tr, 2ch, 2tr) in same place, 1tr in each st and sp working (2tr, 2ch, 2tr) into each corner space, join with ss to top of beginning ch3 (16 stitches across each side of the square plus two chains in each corner).
5
For round 5. Ch3, 1tr in each st working (2tr, 2ch, 2tr) into each corner space, join with a ss to top of beginning ch3, Break off yarn (20 stitches across each side of the square plus two chains in each corner).
6
For round 6. Join Colour B into any corner, ch3, (1tr, 2ch, 2tr) in same place, 1tr in each st working (2tr, 2ch, 2tr) into each corner space, join with ss to top of beginning ch3 (24 stitches across each side of the square plus two chains in each corner).
7
For round 7. Ch3, 1tr in each st working (2tr, 2ch, 2tr) into each corner space, join with a ss to top of beginning ch3, Break off yarn (28 stitches across each side of the square plus two chains in each corner).
8
For round 8. Join border colour into any corner, ch3, (1tr, 2ch, 2tr) in same place, 1tr in each st working (2tr, 2ch, 2tr) into each corner space, join with ss to top of beginning ch3. Break off yarn (32 stitches across each side of the square plus two chains in each corner). Once you're finished, repeat! You'll need 5 in total.
Part 3: The arrow square & the arrow triangle
Using the skills and stitches you’ve learned so far, this week you will be making the arrow square with treble crochet (dc in the US) and double crochet (sc in the US) stitches.
Part 3A: How to crochet the arrow square
1
To get started. With Colour C ch4, join with a ss to form loop. For round 1, ch3, 15tr into loop, join with a ss to top of beginning ch3 (16tr).
2
For round 2. Ch3, (1tr, 2ch, 2tr) in same place, *miss 1tr, (2tr, 2ch, 2tr) in next tr; repeat from * around, ending with miss 1tr and join with a ss to top of beg. ch3 (8 treble groups).
3
For round 3. Ss into first 2ch space, ch3, (2tr, 2ch, 3tr) in same space, *2ch, 2dc in next 2ch space, 2ch, *(3tr, 2ch, 3tr) in next 2ch space; repeat from * around ending with 2ch, 2dc in final 2ch space, 2ch and join with a ss to top of beg. Ch3. Break off yarn (You should have 12 stitches across each side of the square plus two chains in each corner).
4
For round 4. Join border colour into any corner, ch3, (1tr, 2ch, 2tr) in same place, 1tr in each st and 2tr in each sp working (2tr, 2ch, 2tr) into each corner space, join with ss to top of beginning ch3 (16 stitches across each side of the square plus two chains in each corner).
5
For round 5. Ch3, 1tr in each st working (2tr, 2ch, 2tr) into each corner space, join with a ss to top of beginning ch3, Break off yarn (20 stitches across each side of the square plus two chains in each corner).
6
For round 6. Join Colour C into any corner, ch3, (1tr, 2ch, 2tr) in same place, 1tr in each st working (2tr, 2ch, 2tr) into each corner space, join with ss to top of beginning ch3 (24 stitches across each side of the square plus two chains in each corner).
7
For round 7. Ch3, 1tr in each st working (2tr, 2ch, 2tr) into each corner space, join with a ss to top of beginning ch3, Break off yarn (28 stitches across each side of the square plus two chains in each corner).
8
For round 8. Join border colour into any corner, ch3, (1tr, 2ch, 2tr) in same place, 1tr in each st working (2tr, 2ch, 2tr) into each corner space, join with ss to top of beginning ch3. Break off yarn (32 stitches across each side of the square plus two chains in each corner). Once finished, repeat! You'll need 4 of these.
Part 3B: How to crochet the arrow square
1
To get started. With Colour C ch4, join with a ss to form loop. For round 1, ch4, 7tr into loop, ch1, 1tr, turn.
2
For round 2. Ch4, 2tr in sp, *miss 1tr, (2tr, 2ch, 2tr) in next tr; repeat from * twice, 2tr in sp, ch1, 1tr in top of turning ch, turn.
3
For round 3. Ch4, 2tr in sp, 1tr in first tr, ch2, 2dc in next sp, ch2, (3tr, 2ch, 3tr) in next sp, ch2, 2dc in next sp, ch2, 1tr in last tr, 2tr in sp, ch1, 1tr in top of turning ch, turn. Break off colour (13 stitches per side).
4
For round 4. Join border colour into top of last tr worked, ch4, 2tr in sp, 1tr in each st, 2tr in each space, working (2tr, 2ch, 2tr) in top sp, 2tr in sp, ch1, 1tr in top of turning ch, turn (17 stitches per side).
5
For round 5. Ch4, 2tr in sp, 1tr in each st, working (2tr, 2ch, 2tr) in top sp, 2tr in sp, ch1, 1tr in top of turning ch. Break off border colour (21 stitches per side).
6
For round 6. Join Colour C in top of last tr worked and repeat round 5 (25 stitches per side).
7
For round 7. Repeat round 5. Break off yarn (29 stitches per side).
8
For round 8. Join border colour in top of last tr worked and repeat round 5. Break off yarn (33 stitches per side). Once finished, repeat! You'll need 2 of these.
Part 4: Stocking stitch square
Using the skills and stitches you’ve learned so far, this week you will be making the stocking stitch square using the hump stitch!
Part 4: How to crochet the stocking stitch square
Pro Tip
When you work a htr there is a 3rd loop that sits at the back of the stitch. Working into this stitch only (also known as the hump stitch) creates a knitting style, stocking stitch. Fasten off at the end of each row, join on in corner space for start of next row.
1
To get started. With Colour D, ch4, ss ends to make loop. For round 1, ch2, 3 htr into the loop, ch2, *4 htr into the loop, ch2* rpt 3 times, ss in beginning ch3. Fasten off and join on in corner space for start of next row.
2
For round 2. Ch5, htr in same ch sp *in hump stitch htr 4, in the corner ch sp (htr, ch2, htr)* rpt to end, ss into beginning ch3. Fasten off and join on in corner space for start of next row.
3
For round 3. Ch5, htr in same ch sp *in hump stitch htr 6, in the corner ch sp (htr, ch2, htr)* rpt to end, ss into beginning ch3. Fasten off and join on in corner space for start of next row.
4
For round 4. Ch5, 2tr in same ch sp *in hump stitch tr 8, in the corner ch sp (2tr, ch2, 2tr)* rpt to end, tr and ss into beginning ch3 (12 stitches across each side of the square plus two chains in each corner). Fasten off and join on in corner space for start of next row.
5
For round 5. Join border colour into any corner, ch3, (1tr, 2ch, 2tr) in same place, 1tr in each st and sp working (2tr, 2ch, 2tr) into each corner space, join with ss to top of beginning ch3 (16 stitches across each side of the square plus two chains in each corner).
6
For round 6. Ch3, 1tr in each st working (2tr, 2ch, 2tr) into each corner space, join with a ss to top of beginning ch3, Break off yarn. (20 stitches across each side of the square plus two chains in each corner.)
7
For round 7. Join Colour D into any corner, ch3, (1tr, 2ch, 2tr) in same place, 1tr in each st working (2tr, 2ch, 2tr) into each corner space, join with ss to top of beginning ch3 (24 stitches across each side of the square plus two chains in each corner).
8
For round 8. Ch3, 1tr in each st working (2tr, 2ch, 2tr) into each corner space, join with a ss to top of beginning ch3, Break off yarn (28 stitches across each side of the square plus two chains in each corner).
9
For round 9. Join border colour into any corner, ch3, (1tr, 2ch, 2tr) in same place, 1tr in each st working (2tr, 2ch, 2tr) into each corner space, join with ss to top of beginning ch3. Once you're finished, repeat. Make 5 in total!
Part 5: The cable square and the cable triangle
Using the skills and stitches you’ve learned so far, this week you will be making the Cable Square using double treble (treble in the US) stitches to create a cable effect.
Part 5A: How to crochet the cable square
Pro Tip
Fasten off at the end of each row, join on in corner space for the start of next row. Cables are made by working around a post on the left, working a couple of stitches and then crossing back over to work around a post on the right.
1
To start. With Colour E, ch4, ss ends to make loop. For round 1, ch3, 3tr into the loop, ch2, *4tr, ch2* rpt 3 times, ss into beginning ch3.
2
For round 2. ch5, 2dc in same ch sp, *dtr around 4th post from hook, dc in 2nd st to the right, dc in next st, dtr around 2nd post to the right, in ch sp (2dc, ch2, 2dc)* rpt to end, in last corner, dc and ss into beginning ch3.
3
For round 3. ch5, dc in same ch sp, *dc next 2, tr around dtr post, dc 2, tr around dtr post, dc 2, in ch sp (dc, ch2, dc)* rpt to end, in last corner, ss into beginning ch3.
4
For round 4.ch5, htr in same ch sp, * htr 3, dtr around 4th tr post from hook, htr in 2nd st to the right, htr in next st, dtr around tr post to the right, in ch sp (htr, ch2, htr)* rpt to end, in last corner, ss into beginning ch3. (You should have 12 stitches across each side of the square plus two chains in each corner).
5
For round 5. Join border colour and ch3, 1tr in each st working (2tr, 2ch, 2tr) into each corner space, join with a ss to top of beginning ch3, Break off yarn (16 stitches across each side of the square plus two chains in each corner).
6
For round 6. Ch3, 1tr in each st working (2tr, 2ch, 2tr) into each corner space, join with a ss to top of beginning ch3, Break off yarn (20 stitches across each side of the square plus two chains in each corner).
7
For round 7.Join Colour E into any corner, ch3, (1tr, 2ch, 2tr) in same place, 1tr in each st working (2tr, 2ch, 2tr) into each corner space, join with ss to top of beginning ch3 (24 stitches across each side of the square plus two chains in each corner).
8
For round 8. Ch3, 1tr in each st working (2tr, 2ch, 2tr) into each corner space, join with a ss to top of beginning ch3, Break off yarn. (28 stitches across each side of the square plus two chains in each corner).
9
For round 9. Join border colour into any corner, ch3, (1tr, 2ch, 2tr) in same place, 1tr in each st working (2tr, 2ch, 2tr) into each corner space, join with ss to top of beginning ch3. Break off yarn (32 stitches across each side of the square plus two chains in each corner). Once finished, repeat! You'll need 4 in total.
Part 5B: How to crochet the cable triangle
1
To get started. With Colour E, ch4, ss to form loop. For round 1, ch4 (counts as tr throughout), 3tr, ch3, 3tr, ch1, tr (8 sts).
2
For rounds 2 and 3. Ch4, turn, 2tr in ch sp, tr in each st, (2tr, ch2, 2tr) at corner, tr in each st, 2tr in ch sp, tr in 3rd ch.
3
For rounds 4 and 5. Join Border Colour, and repeat rounds 2 and 3 (16 sts, 24 sts).
4
For rounds 6 and 7. Join Colour E, repeat rounds 2 and 3 (32 sts, 40 sts).
5
For round 8. Join Border Colour, repeat round 4 (48 sts). Once finished, repeat! You'll need to make 2.
Part 6: Side triangles, sewing up and finishing touches
Welcome to week six, and the final elements of the CAL! This week, you’ll be making the side triangles to make your blanket into a rectangle, learn how to sew up your blanket and finish with pom poms or even a few tassels.
Part 6A: How to crochet the side triangle
1
To get started. With your chosen side triangle colour, ch4, ss to form loop. For round 1, ch4, 3tr into the loop, ch3, 3tr into the loop, ch1, tr into the loop.
2
For rounds 2 and 3. Ch4, turn, 3tr in ch sp, (ch1, 3tr, ch3, 3tr) ch1, 3tr, ch1, tr in 3rd ch. Ch4, turn, *3tr in ch sp, ch1* rpt, (3tr, ch2, 3tr), *ch1, 3tr* rpt, ch1, tr in 3rdch.
3
For round 4. With the border colour, ch4, turn, 2tr in ch sp, *tr in each st, tr in ch sp* rpt (2tr, ch2, 2tr) at corner, *tr in each st, tr in ch sp* rpt, 2tr in ch sp, tr in 3rdch (16 sts).
4
For round 5. Ch4, turn, 2tr in ch sp, tr in each st, (2tr, ch2, 2tr) at corner, tr in each st, 2tr in ch sp, tr in 3rdch (20 sts).
5
For rounds 6 and 7. With your motif colour, rpt round 5 (24 sts, 28 sts).
6
For round 8. With border colour, rpt round 5 (32 sts). Once you're finished, repeat. Make 10 in total (five of each shade).
Blocking
If you find that your squares and triangles are not as flat and shaped as you would like, it will make it easier to block them before you sew them together. You can do this in two ways – with cold water or steam.
Cold water blocking
Pin each square on to foam pads or a thick towel on the floor, ensuring that they are all pinned to the same shape and size. Spritz each square and triangle with a mist of water until damp, and then leave overnight to dry.
Steam blocking
Pin each square on to foam pads or or a thick towel on the floor, or work individually on a table or ironing board, ensuring that they are all pinned to the same size and shape. Hold a steam iron above each square and let the warm steam billow down over each square and triangle until damp. Do NOT allow the iron to touch the work! Allow the squares and triangles to dry overnight.
Part 6B: Sewing up
We’re sewing up our blankets with a simple whip stitch. Emma from Steel & Stitch will show you how to sew or crochet in your ends and sew the squares and triangles together.
Part 6C: Final flourishes
Both of the blankets have been edged differently. Emma Potter has added a row of trebles all the way around her blanket, and added cheeky pom poms to each corner, and Emma from Steel & Stitch has worked a simple border of the hump stitch you used for the Stocking Stitch square in three different colours, and added decadent tassels to the corners.
You can add a finishing edge of your choice (or not!) and add pom poms or tassels!
Phew! That's it - you're done! We hope you love your new blanket.