How to crochet tea towel edgings
Published on December 3, 2019 By Merion 3 min read
In days gone by, families would embroider and mark their table linen - let's bring those traditions back by crocheting beautiful celebration edgings on to our linens for special occasions!
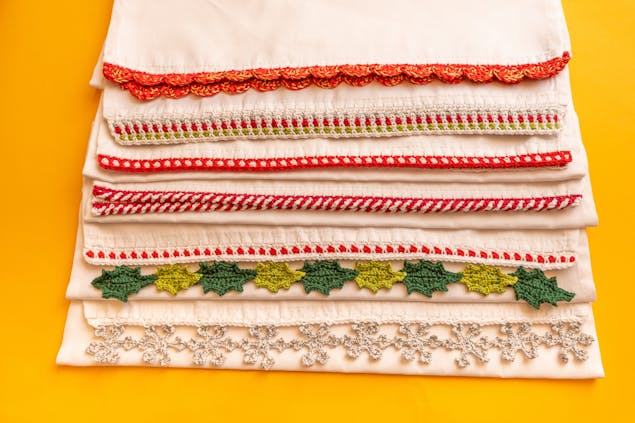
When Chloe Bailey told us she was decorating her Christmas linens with holly leaves and snowflakes this year, we just knew you'd want to learn how to do it too! Follow her easy patterns and tutorial videos, and transform your home for the holidays.
Using Paintbox Yarns Cotton DK, and Metallic DK, Chloe has added all kinds of edges to suit the season! You can use your own special shade palette - classic reds and greens for Christmas, Scandinavian red and white, or silver and blue for an icy theme - and add red and gold to celebrate Chinese New Year! We love silver or gold for New Year's Eve, and gold and jewel tones for Diwali, - and because these edgings can be used for any occasion, you can add your favorite colors for parties and special birthdays!
Abbreviations used (US terms):
CH – chain
SLST – slip stitch
SC – single crochet
HDC – half double crochet
DC – double crochet
Let's get started!
To add a crochet edging to any edge, you will first need to sew a row of blanket stitch along the edge to work into, and Chloe's helpful video shows you how! Follow that with a single crochet edge, and some moss stitch for a simple Scandinavian edging.
How to blanket stitch along an edge
1
Join the yarn into the right hand corner of the tea towel, you can sew it in from the back and hide the knot in the hem of the fabric.
2
Stitch from back to front, approximately 1cm in from the corner and approximately 0.5cm below the edge of the fabric. Before you pull the loop through completely, pass your needle through the loop from front to back. You now have a thread that runs along the top edge of the fabric.
3
Repeat this stitch along to the end, fasten off by sewing into the corner and secure at the back.
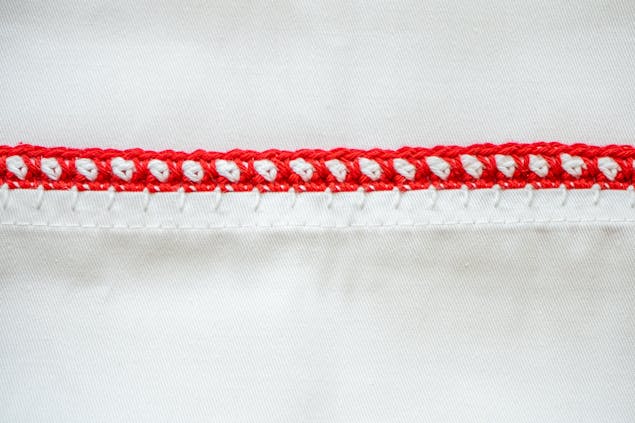
Simple Scandinavian inspired edging
1
Using a 4mm hook, work a row of SC into the blanket stitch base. If you have spaced your blanket stitches about 1cm, this will fit 2 SC nicely in each gap. When you reach the end, fasten off the yarn.
2
Join contrast color yarn into the 2nd stitch of row 1. *SC, CH1, skip next stitch*, repeat *to* along to the end. Fasten off.
3
Join original color yarn into the 1st stitch of row 1. CH3, SC into the first skipped stitch on row 1, CH1, *SC into the next skipped stitch on row 1, CH1*, repeat *to* along to the end. When you have worked the final SC into the last skipped stitch on row 1, CH2 and fasten off. Sew this end chain to the left of the final stitch on row 2 so that you have the same corner edge at both sides.
Holly leaves and snowflakes edging
Feeling festive? Whether you celebrate Christmas or you're feeling wintery, these holly leaves will help you bring on the hygge! Work the leaves separately, stitch together and then attach to any edging.
For the holly leaves
You can experiment with different hook sizes for your leaves. For the tea towel pictured I have used a 2.5mm hook with Paintbox Yarns Cotton DK and Paintbox Yarns Metallic DK. (NB. in the tutorial video I have used a 4mm hook so that the stitches are easier to see). Using a smaller hook means the finished leaves will have a nice tight structure.
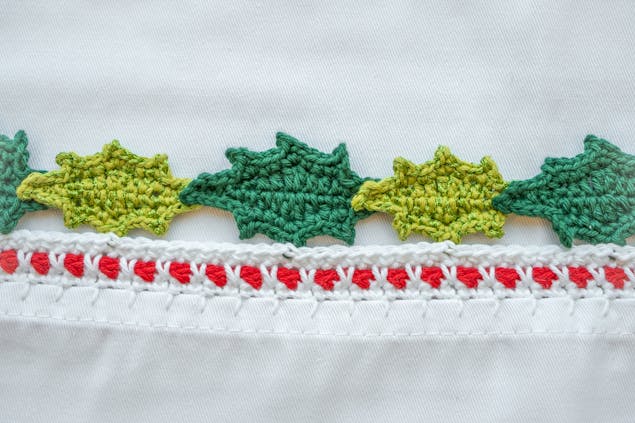
1
Start your holly leaf with CH14. This chain forms the central spine of your leaf.
2
Round 1: SLST into the 2nd CH from your hook, and then SLST into the next CH. SC into the next 2 CH, HDC into the next 2 CH, 2DC into the next CH, HDC into the next 2 CH, SC into the next 2 CH, SLST into the next 2 CH. CH1 and rotate your leaf, then work the same stitches along the other side of the starting chain: SLST 2, SC 2, HDC 2, 2DC, HDC 2, SC 2, SLST 2, CH1 and rotate.
3
Round 2: SLST 4, *SC, CH2, SLST into 1st CH, SC into same stitch* (this forms a picot stitch with a point), SC 2, *picot*, SC 2, *picot*, SLST 4, *picot* into the end stitch. Rotate the leaf and repeat along the other side, but do not work the final picot stitch. When you reach the end, fasten off. Make as many holly leaves as you need for your edge, sew them together using the tail ends, and then sew in the ends.
4
To join the row of leaves to the edge of your tea towel, work a row of SC into the blanket stitch base and SLST the centre picot point of each holly leaf as you work along the edge.
For the snowflakes
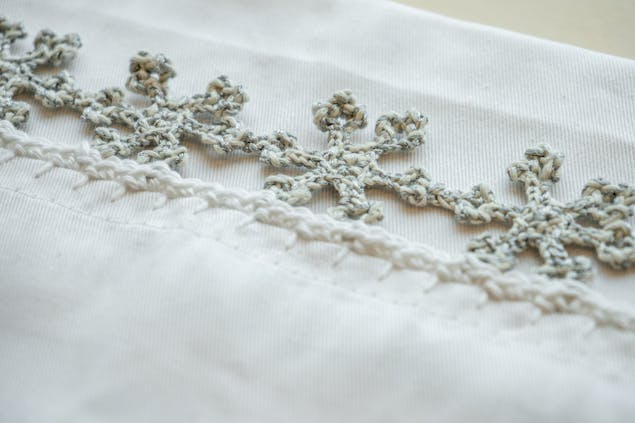
For the snowflakes I have used a 2.5mm hook with Paintbox Yarns Metallic DK in Martini. (NB. in the tutorial video I have used a 4mm hook so that the stitches are easier to see).
1
Start by making 6 SC in a magic circle, join with SLST to the 1st SC and pull magic circle closed.
2
CH7, SLST into 4th CH from hook, CH3, SLST into same 4th CH from hook, CH3, SLST into same 4th CH from hook. SLST into each of the remaining 3 CH back down to the starting round. Join with SLST to the next SC.
3
Repeat the above “arm” 5 more times so that you have 6 arms on your snowflake. Fasten off and sew in ends.
4
Make as many snowflakes as you need for your edge, and join them point to point to form a continuous row. To attach your snowflakes to the edge of your tea towel, work a row of SC into the blanket stitch base and SLST the centre picot points at the end of the snowflake arms as you work along the edge.
Candy cane edging
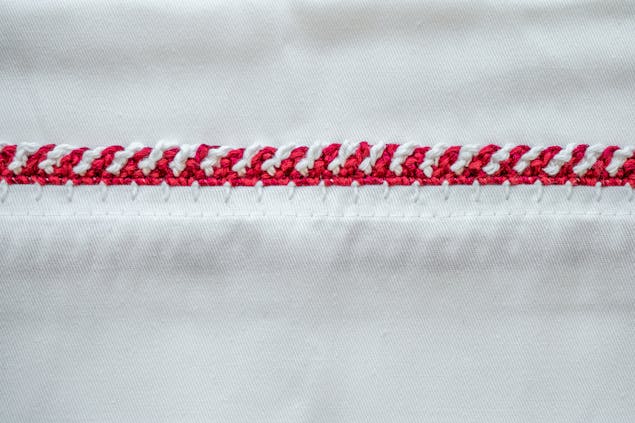
Jingle allllll the way with this gorgeous twisted candy cane edging! Chloe shows you how to add this sweet candy cane striped edging to your holiday tea towels and festive table linen!
For the Candy Cane edging in the video, I used Paintbox Yarn Metallic DK in Sangria, Paintbox Yarns Cotton DK in Paper White, and a 4mm hook.
1
Begin with a row of SC into your blanket stitch base using red yarn. When you reach the end, fasten off.
2
Join red yarn to the 1st SC and CH3, then drop yarn.
3
Join white yarn to the 2nd SC and CH3, then drop yarn.
4
Pick up red yarn, bring it over the top of the white yarn, and SLST into the next SC. CH3, then drop yarn.
5
Pick up white yarn, bring it over the top of the red yarn, and SLST into the next SC. CH3, then drop yarn.
6
Repeat steps 3 & 4 until you reach the end, fasten off and sew in ends.
TOP TIP: swap your balls of yarn over after each color change to avoid yarn tangles!
Chinese New Year - red and gold fans
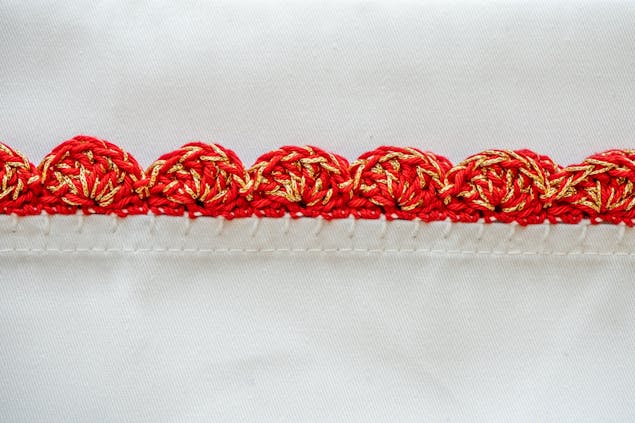
Chloe's special Chinese New Year edging is made of red and gold fan shapes, so easy to crochet on to any edge - napkins, tablecloths, tea towel and cushions. The combination here of Paintbox Yarns Cotton DK in Pillar Red, and Paintbox Yarns Metallics DK in Sangria.
1
Using a 4mm hook, crochet a row of SC in Paintbox Yarns Cotton DK in Pillar Red into a blanket stitch base, making 2 SC into each blanket stitch gap. TOP TIP: If you want your fans to fit exactly corner to corner then work a multiple of 6 + 1 stitches.
2
Holding your red yarn doubled with a thread of Gold Anchor Artiste Metallic, join yarn in the 1st SC, *skip 2 SC and DC6 into the next SC, skip 2 SC, SLST into next SC*. Repeat *to* until you have completed the desired number of fans along the edge. Fasten off and sew in ends.
V-stitch bobble edging
Chloe has worked these super cute bobbles in different colors, but you can match up to your color scheme or keep them in one shade!
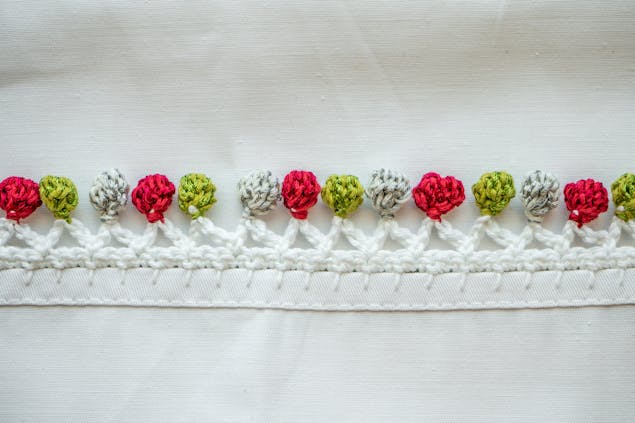
1
Each bauble is made like a pompom on the top of a chain link. Using a 4mm hook, begin by working a row of SC into a blanket stitch base.
2
Join white yarn where you would like your baubles to begin and CH3. (If you want your baubles to fit exactly corner to corner, you’ll need a multiple of 3 + 1 stitches on your SC row).
3
Join contrast color yarn, CH3, work a cluster stitch into the same white chain stitch.
4
When you have 5 cluster loops on your hook, pull yarn through and CH1 to secure.
